HubSpot Integration
The HubSpot Integration plugin automatically transfers order and attendee data from Eventyay to your HubSpot CRM. When a paid order is placed or updated, the plugin pushes the relevant data to HubSpot as Contacts and/or Deals, keeping your CRM in sync with your event registrations.
Connecting to HubSpot
Before configuring the integration, ensure the plugin is enabled.
Enabling the Plugin
If you have already enabled HubSpot at the organizer level (see below), the plugin will be automatically enabled for any newly created events under that organizer. The new event will immediately use the organizer’s default connection and object mappings, requiring no manual setup.
To manually enable the plugin for an existing event:
Go to your Event dashboard.
Click Plugins in the left sidebar.
Navigate to the Integrations tab.
Find Hubspot in the list and click Enable.
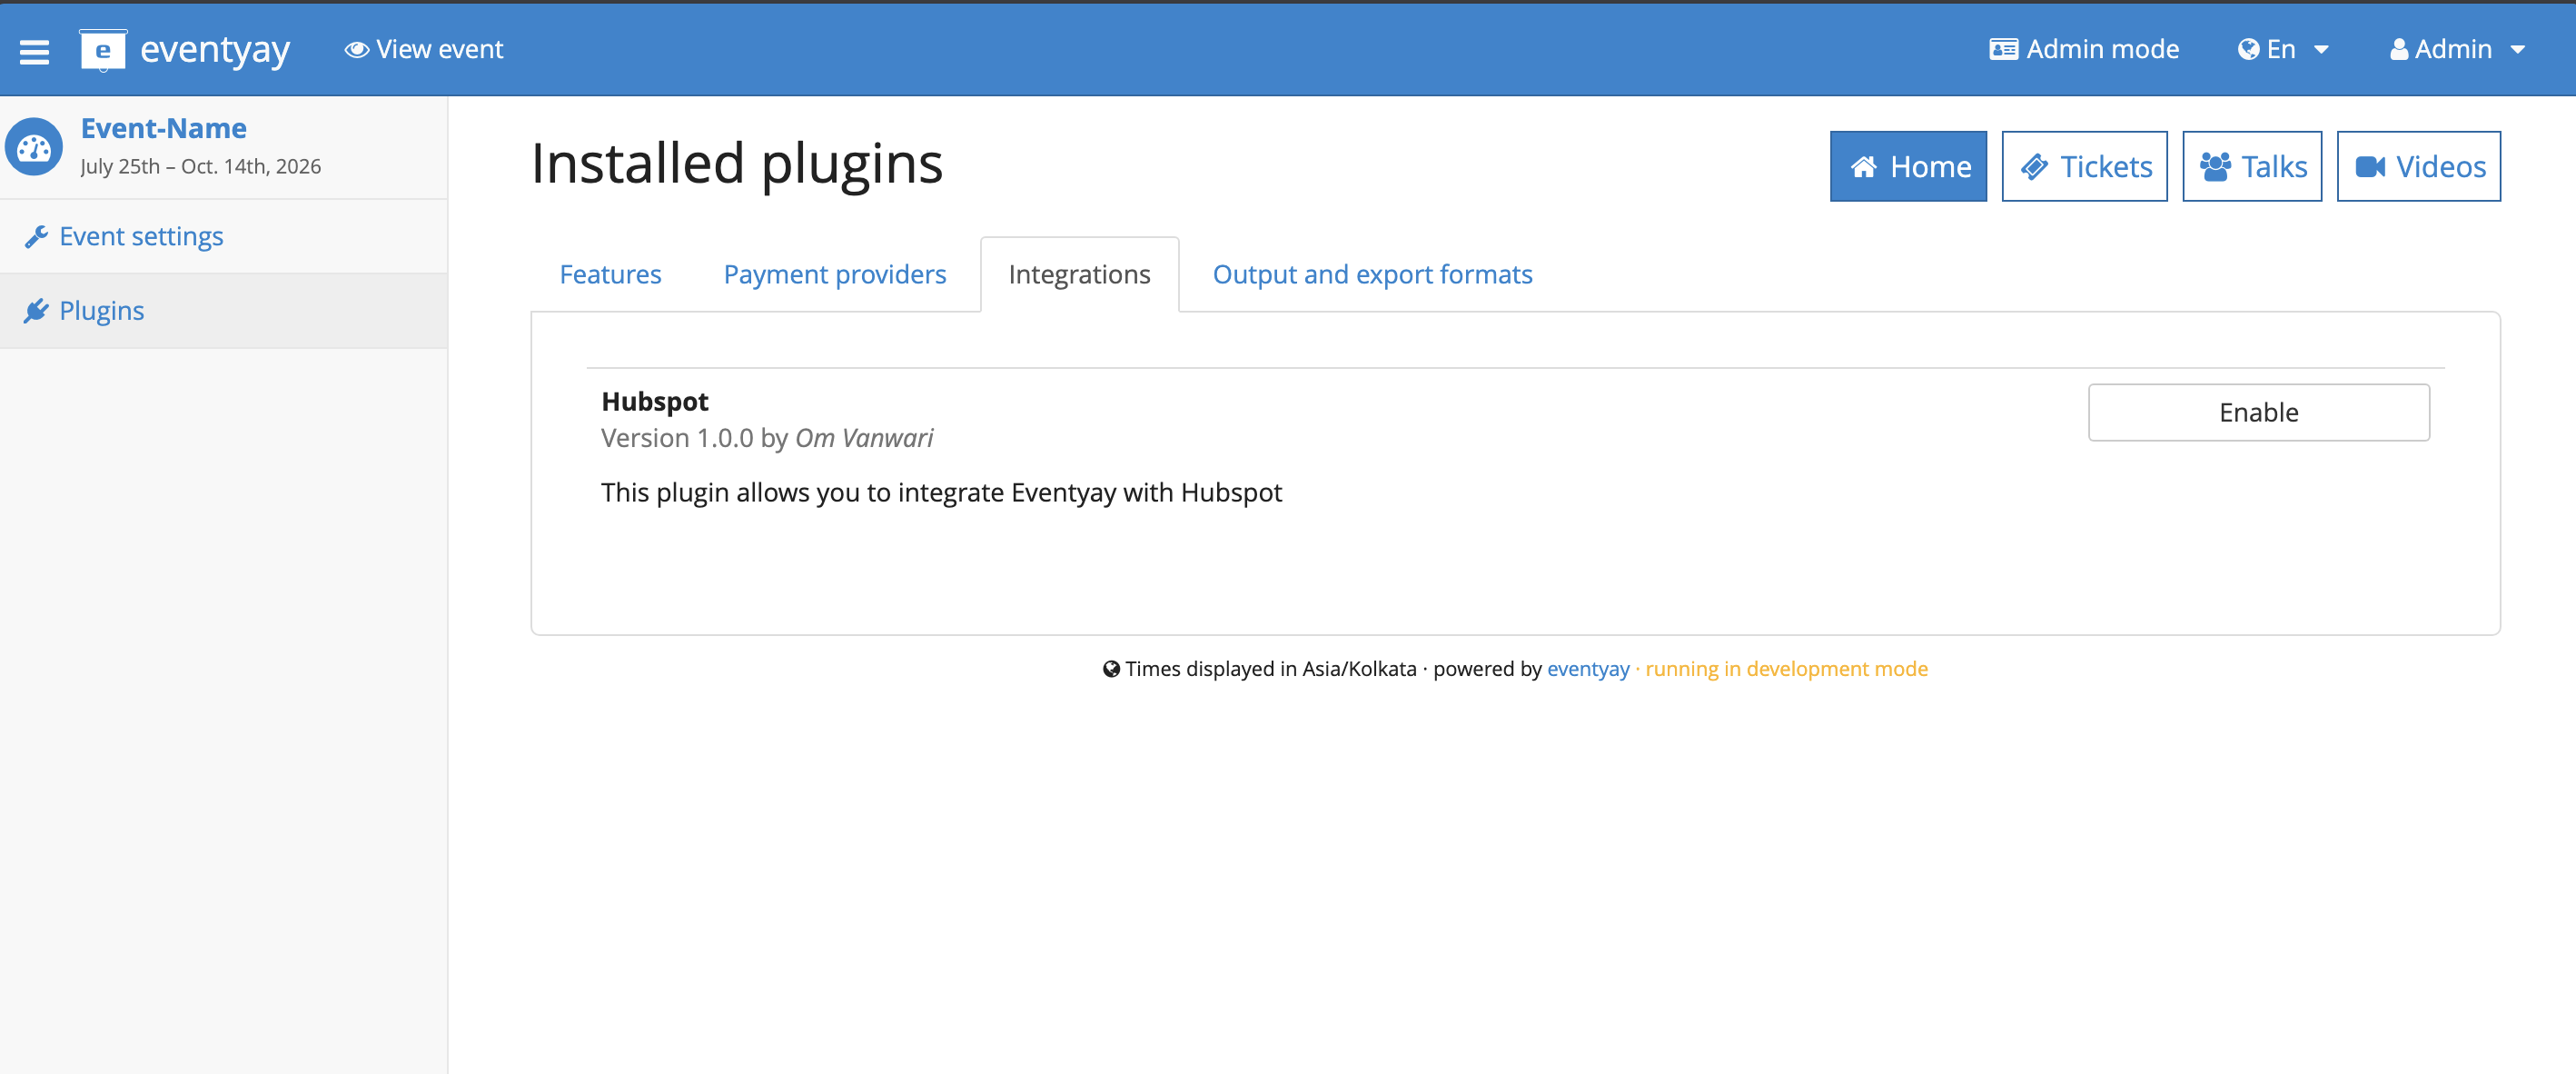
Once enabled, a new HubSpot menu item will appear in the left sidebar of your event dashboard.
Connection Levels
The plugin uses OAuth to securely connect Eventyay to your HubSpot account. You can connect at two levels: for a single event, or for your entire organizer account.
Organizer-level connection
Connecting at the organizer level shares a single HubSpot connection across all events under that organizer. This is the recommended approach if all your events use the same HubSpot account.
In the Eventyay backend, go to your Organizer dashboard.
Click HubSpot in the left sidebar.
Use the toggle in the top-right corner to enable the integration.
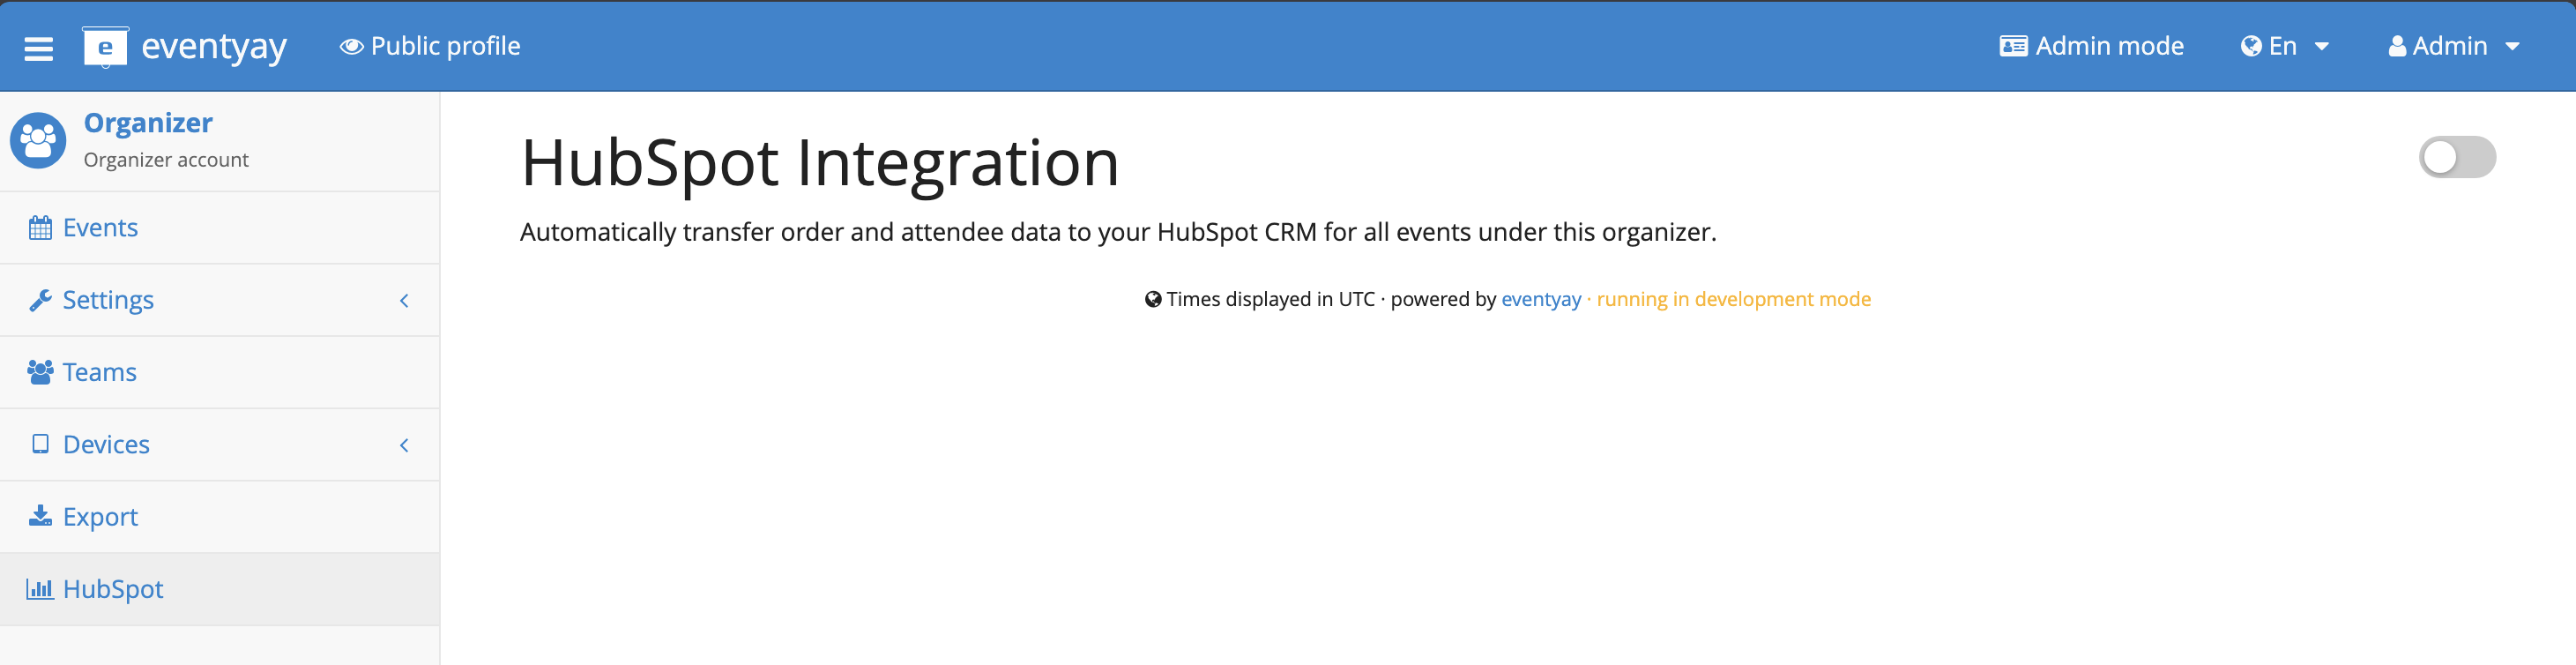
Click Connect to HubSpot.
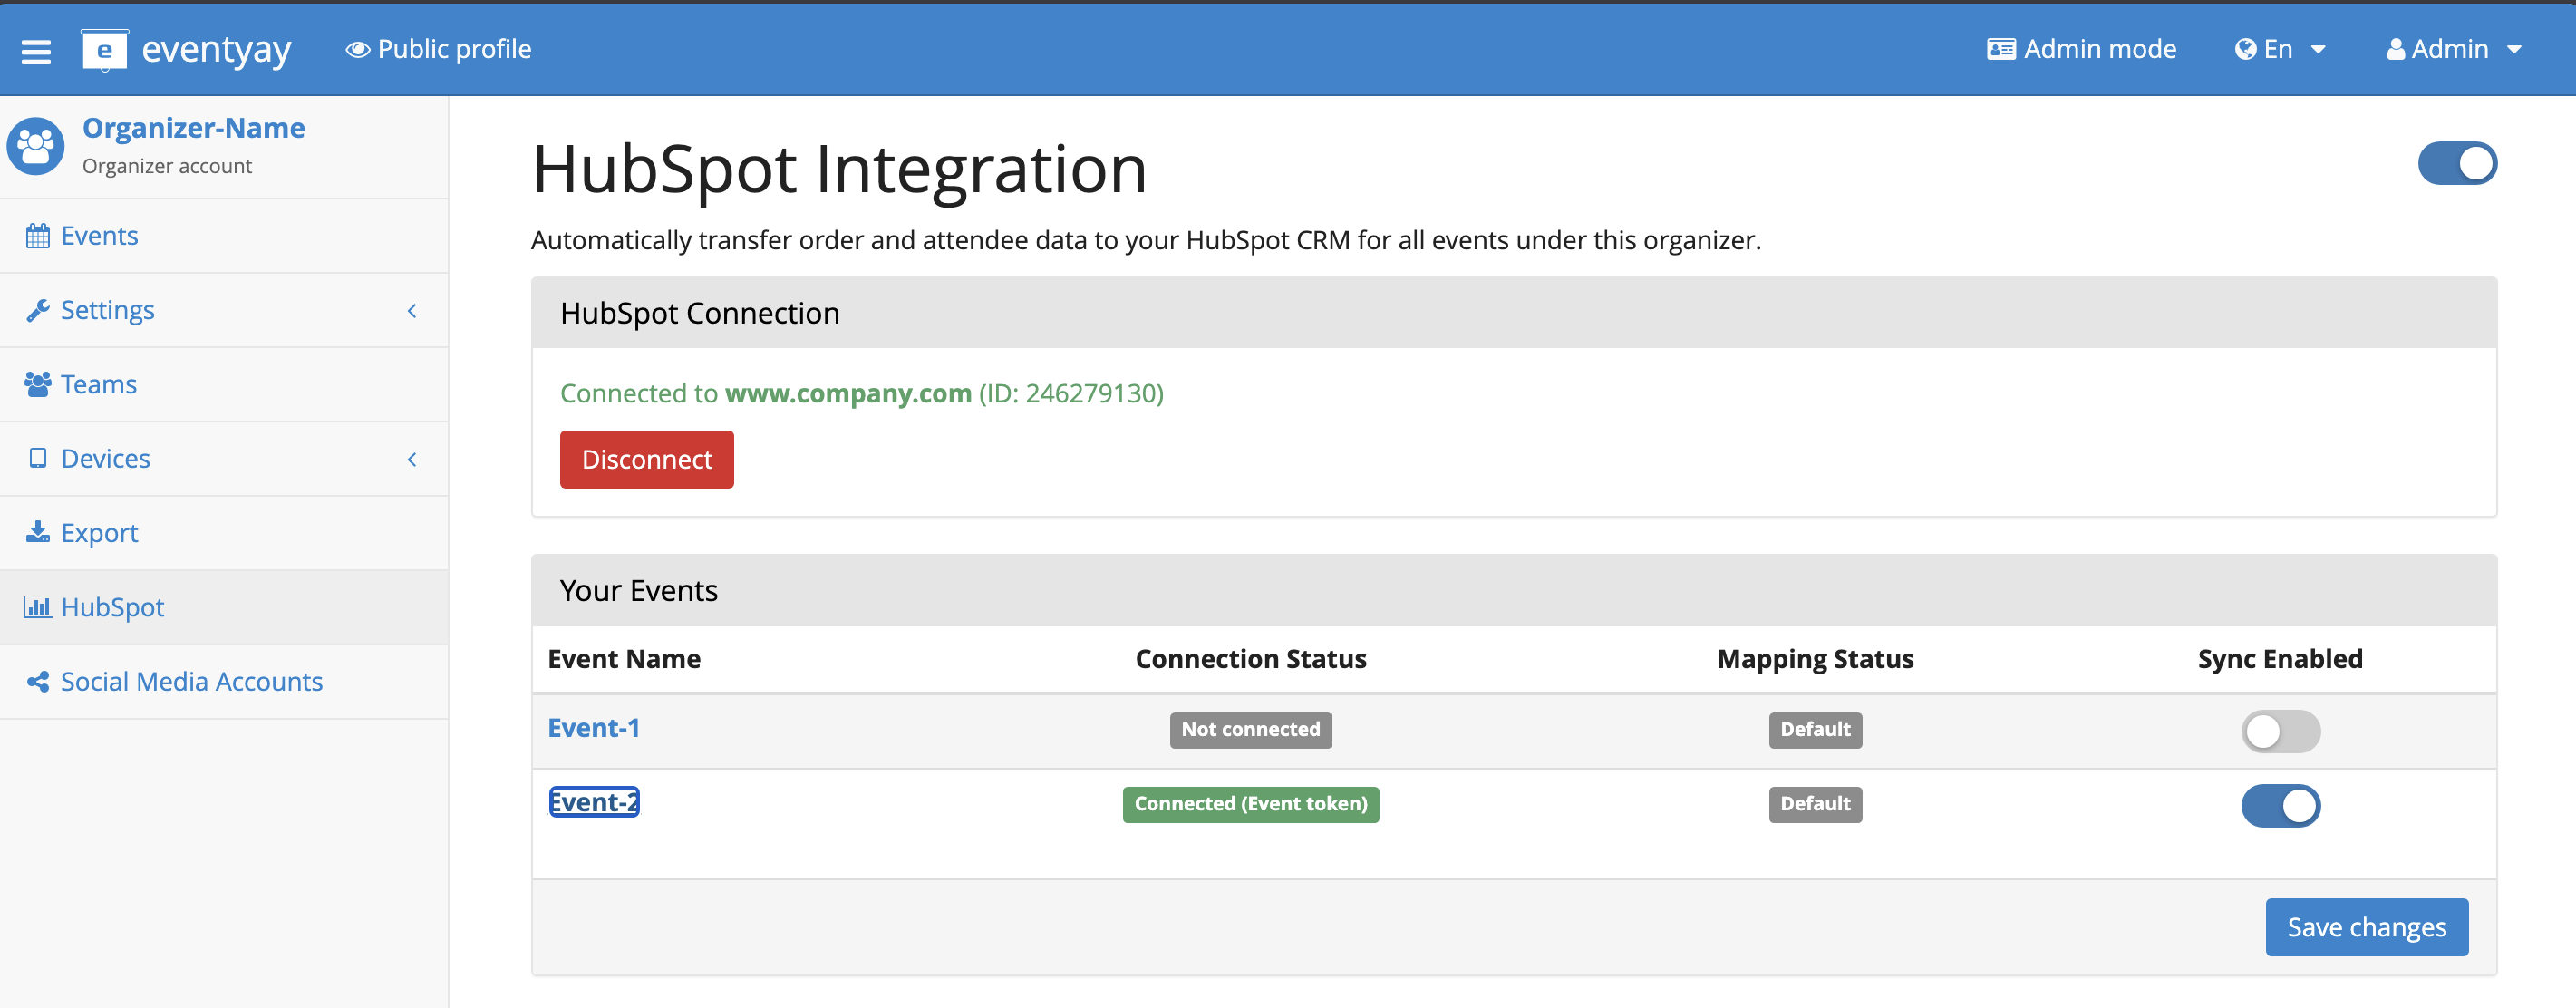
Once connected, the organizer page shows several sections:
- HubSpot Connection
Displays the connected portal name and a Disconnect button.
- Your Events
A table listing each event under this organizer, with columns for:
Connection Status – Whether the event is
Not connected,Connected (Event token)(has its own token), orConnected (Organizer fallback)(uses the organizer’s token).Mapping Status –
Customif the event has its own object/field mappings configured, orDefaultotherwise.Sync Enabled – A per-event toggle to enable or disable synchronization for that specific event.
Click Save changes at the bottom to persist the per-event sync toggles.
- Default Object Mappings
Set up default object and field mappings for all events under this organizer. Events with a
Defaultmapping status will automatically inherit these settings, so you don’t have to configure mappings for every single event.Note: When a new event is created under an organizer that has HubSpot enabled, the integration is automatically turned on for that event and seeded with these organizer default mappings.
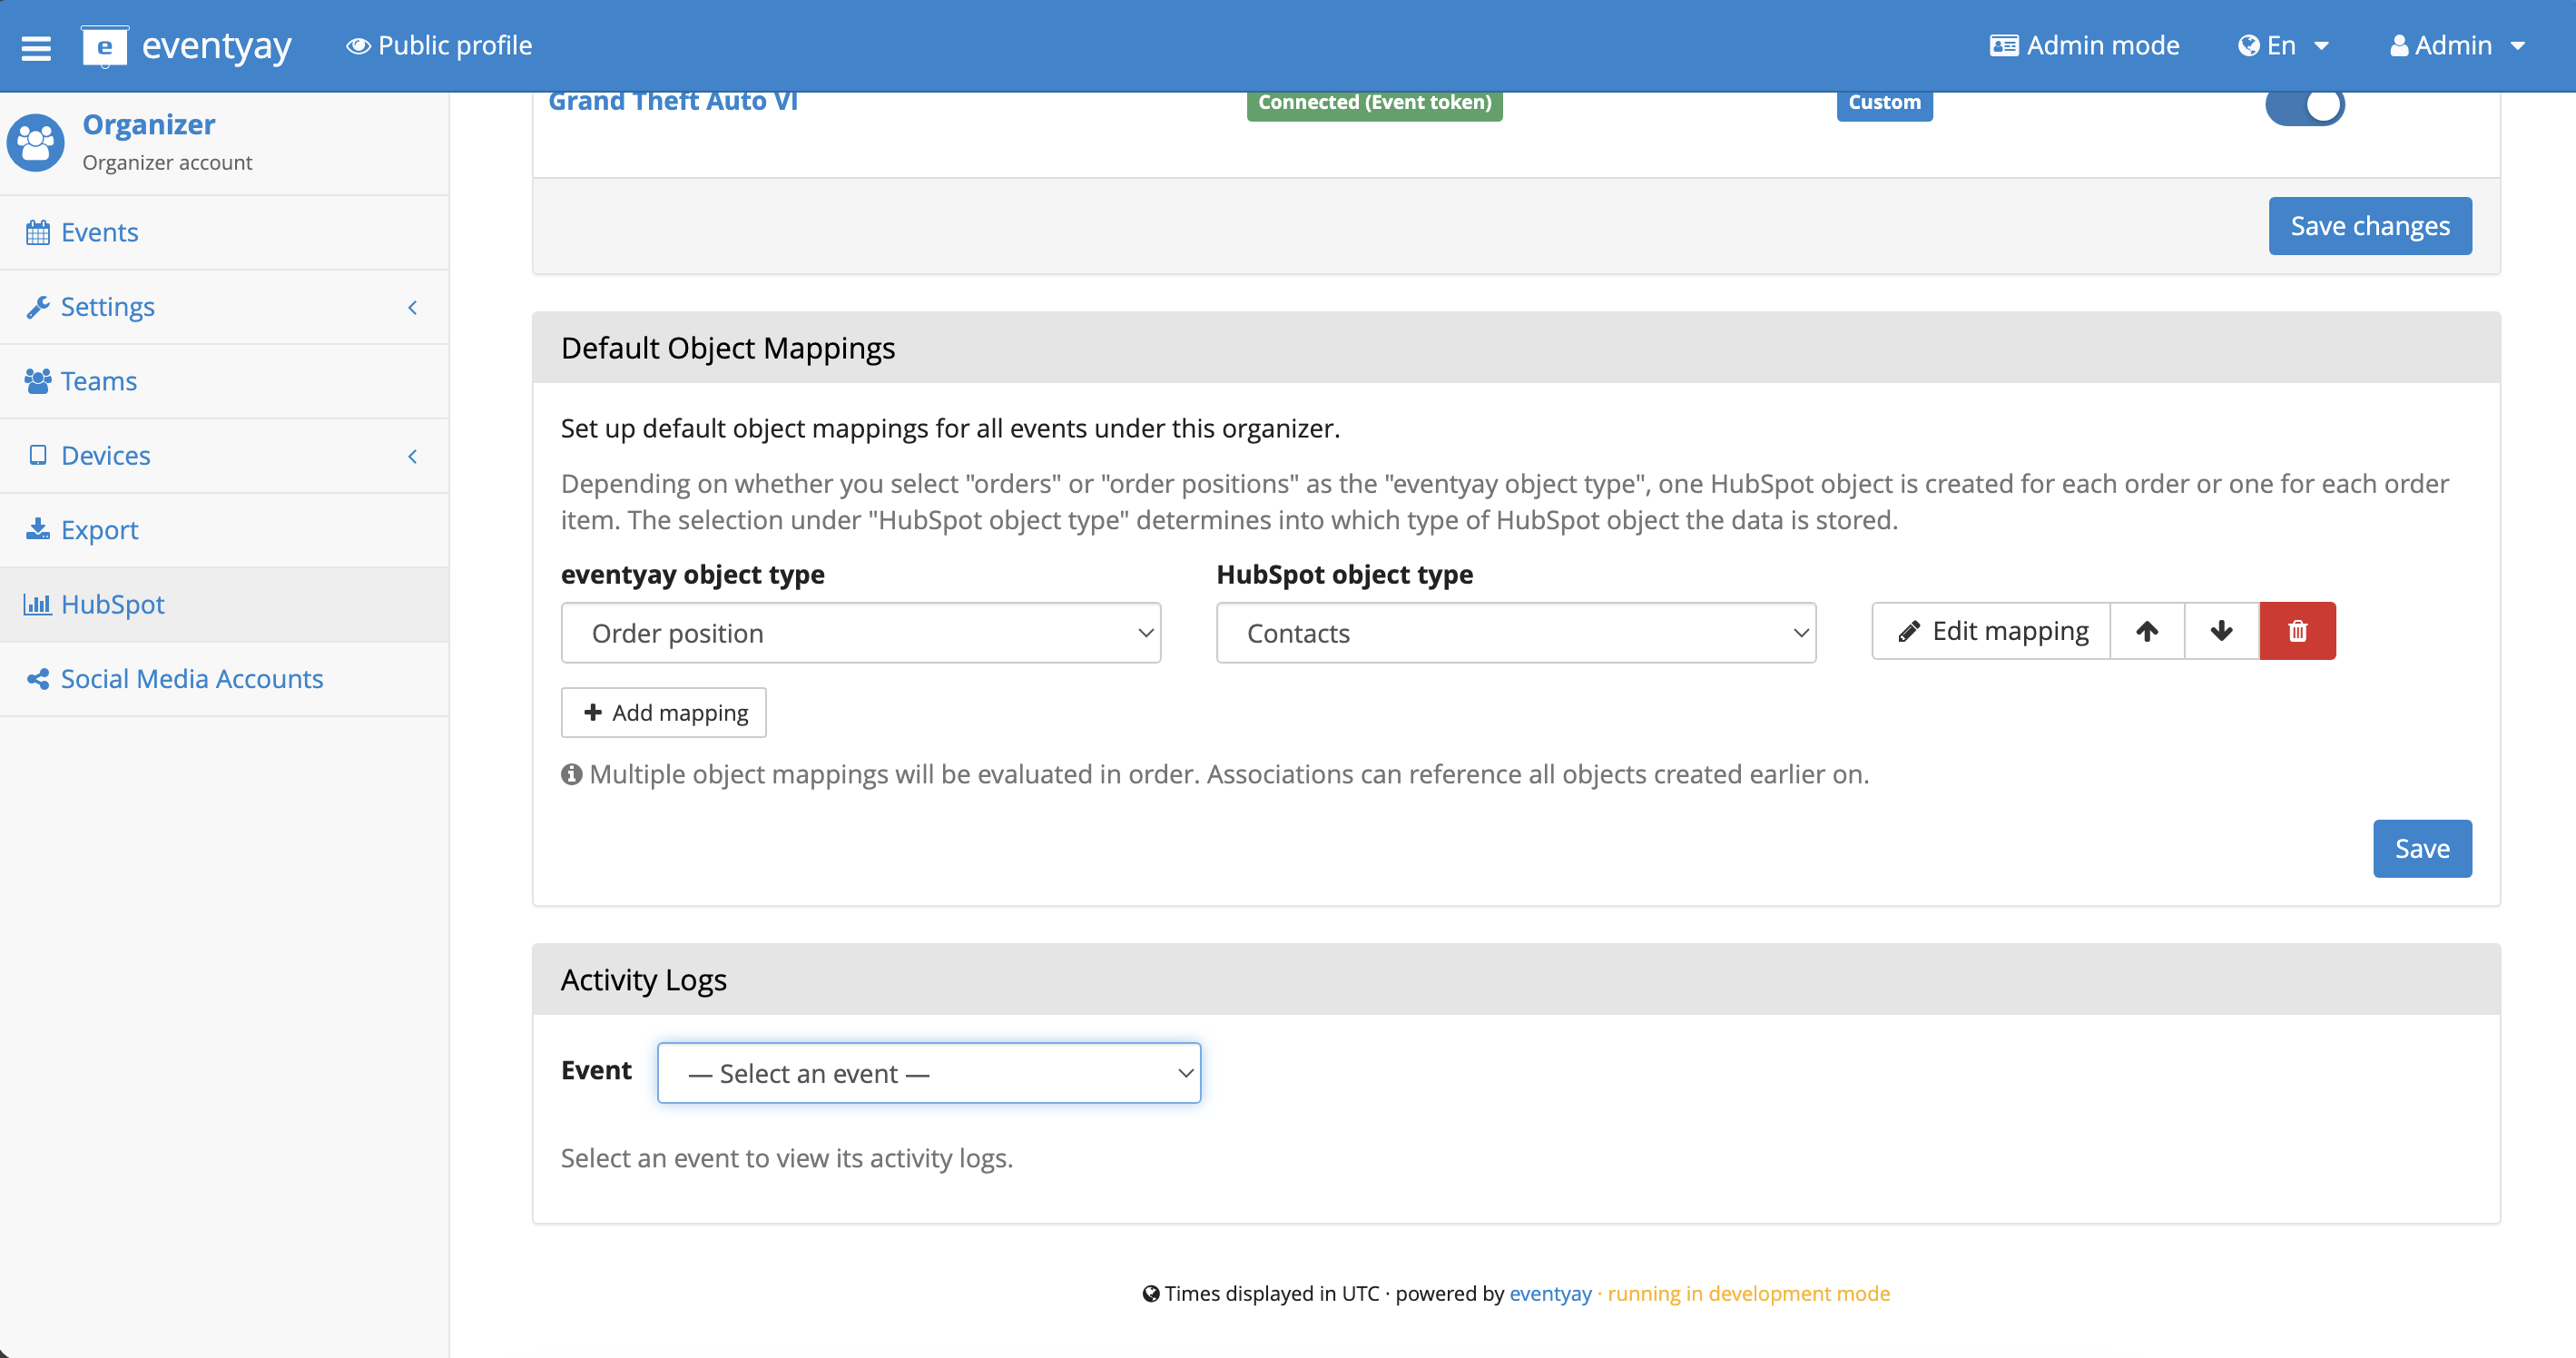
- Activity Logs
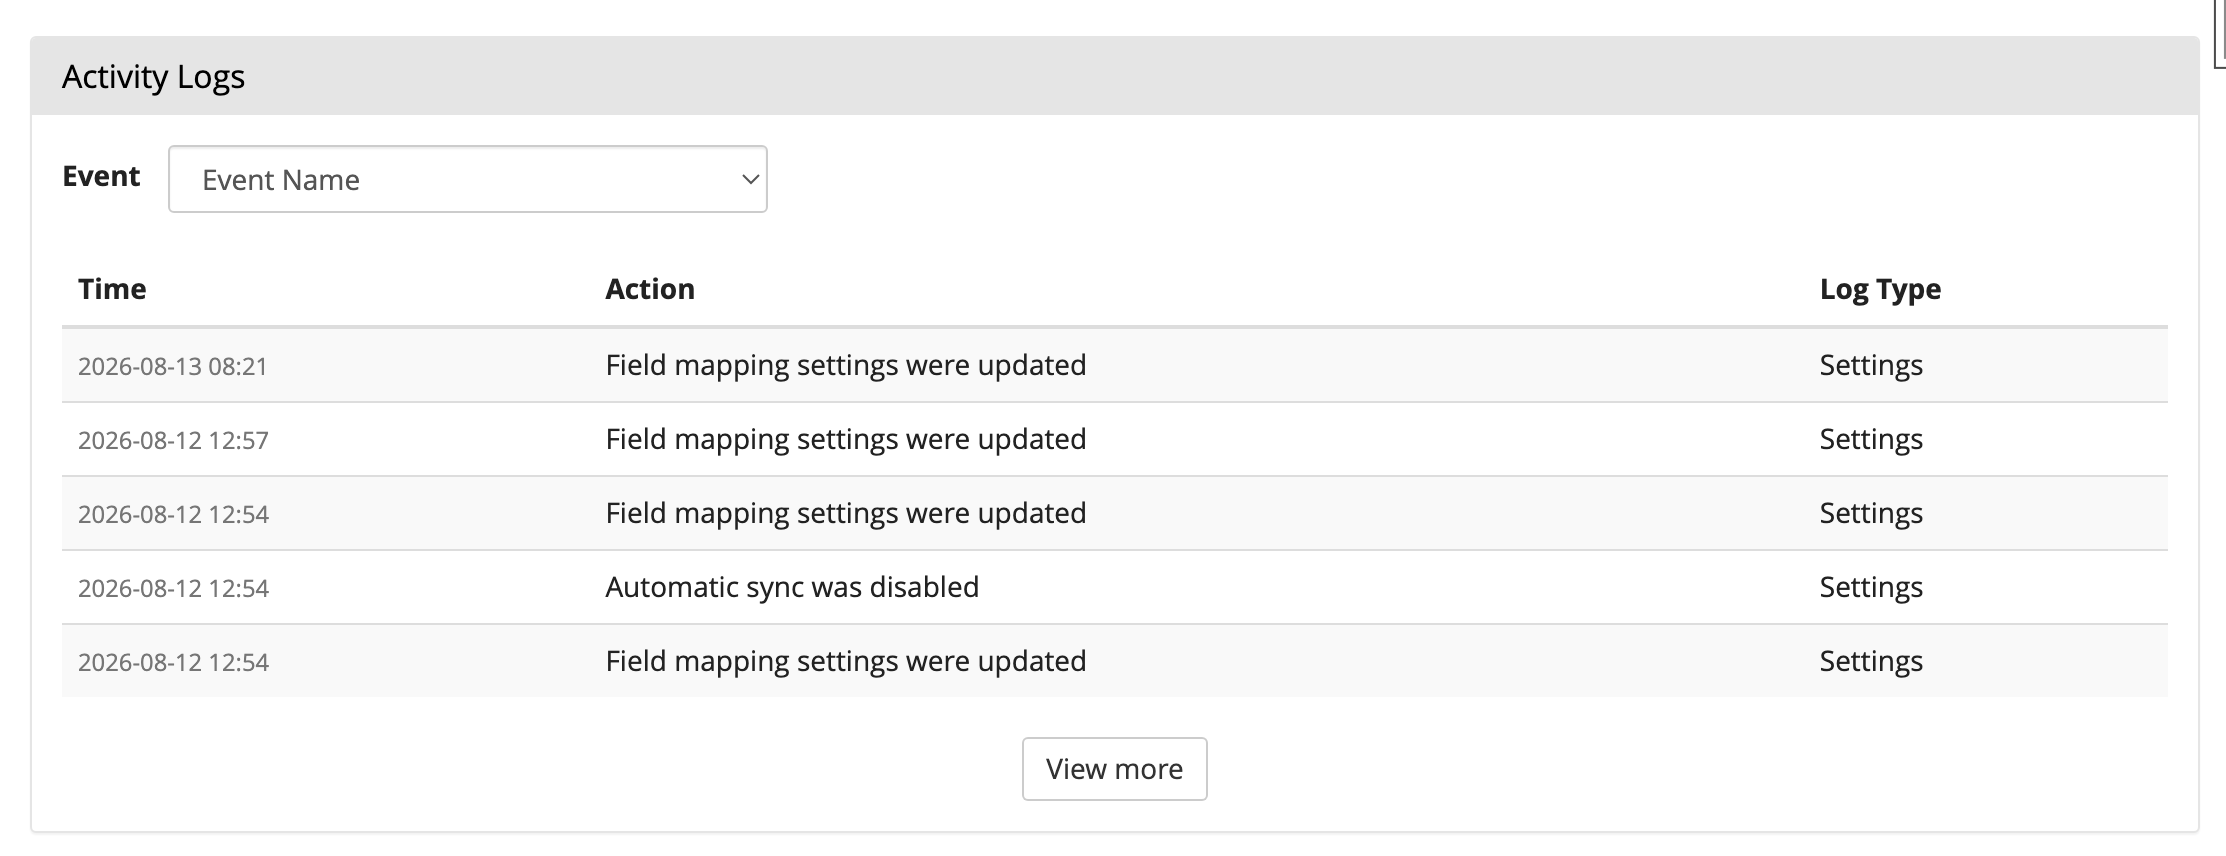
Displays sync and settings logs across all your events in one central place. You can select a specific event from the dropdown to filter the activity logs.
Event-level connection
If you need to connect a specific event to a different HubSpot account, you can connect directly from the event dashboard:
Go to your Event dashboard.
Click Hubspot in the left sidebar.
Click Connect in the HubSpot Connection panel.
OAuth flow
When you click Connect (at either level), you are redirected to HubSpot’s authorization page:
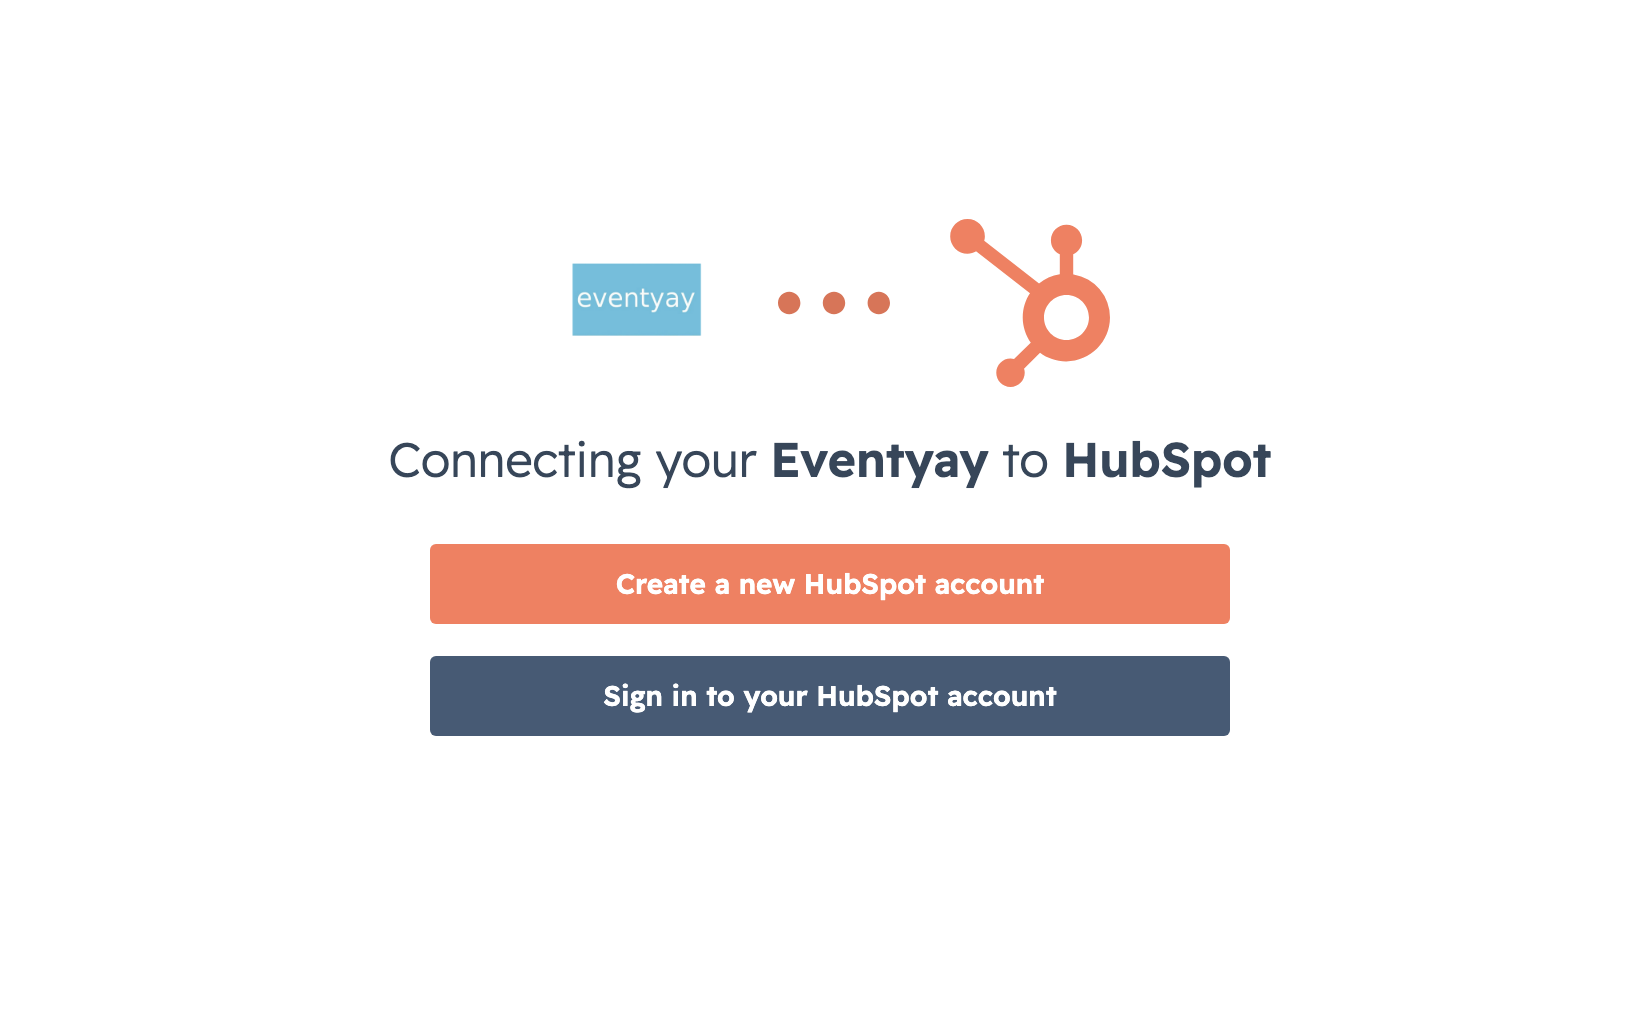
Step 1: Choose to sign in to an existing HubSpot account or create a new one.
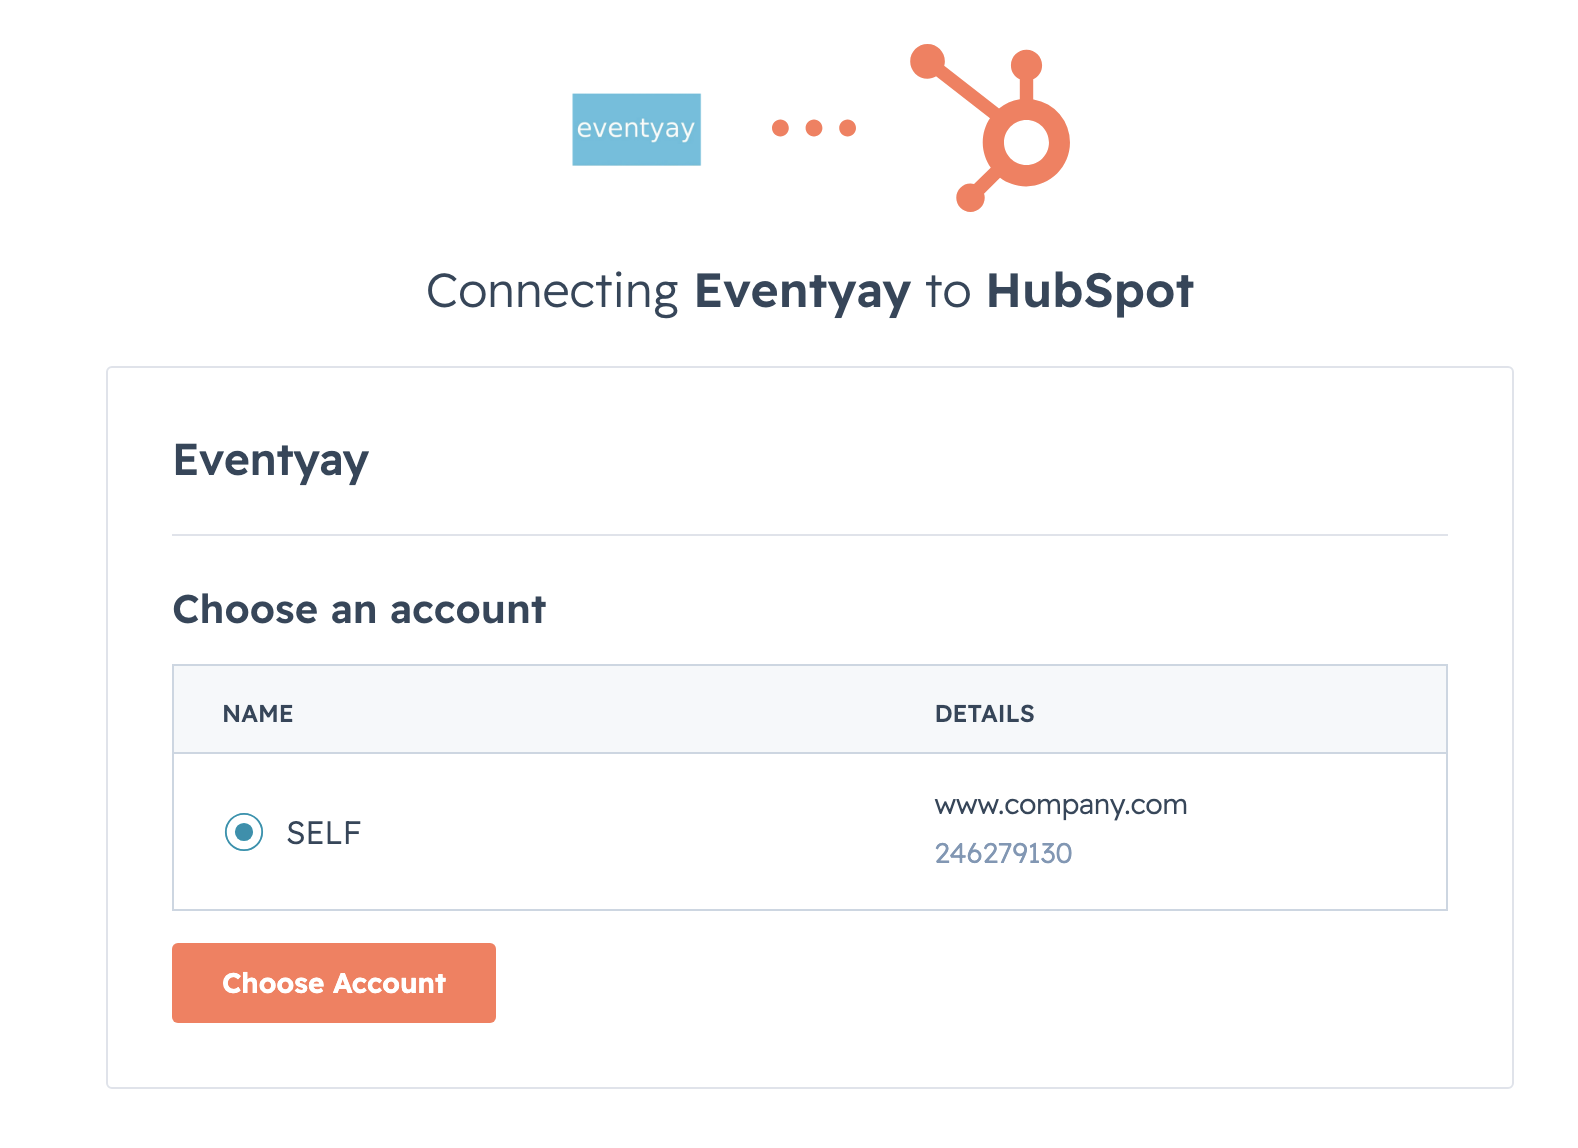
Step 2: Select which HubSpot portal to connect.
Step 3: Review the permissions Eventyay is requesting. The plugin requires scopes to create, delete, or make changes to Contacts and Deals. Note that this includes delete capabilities.
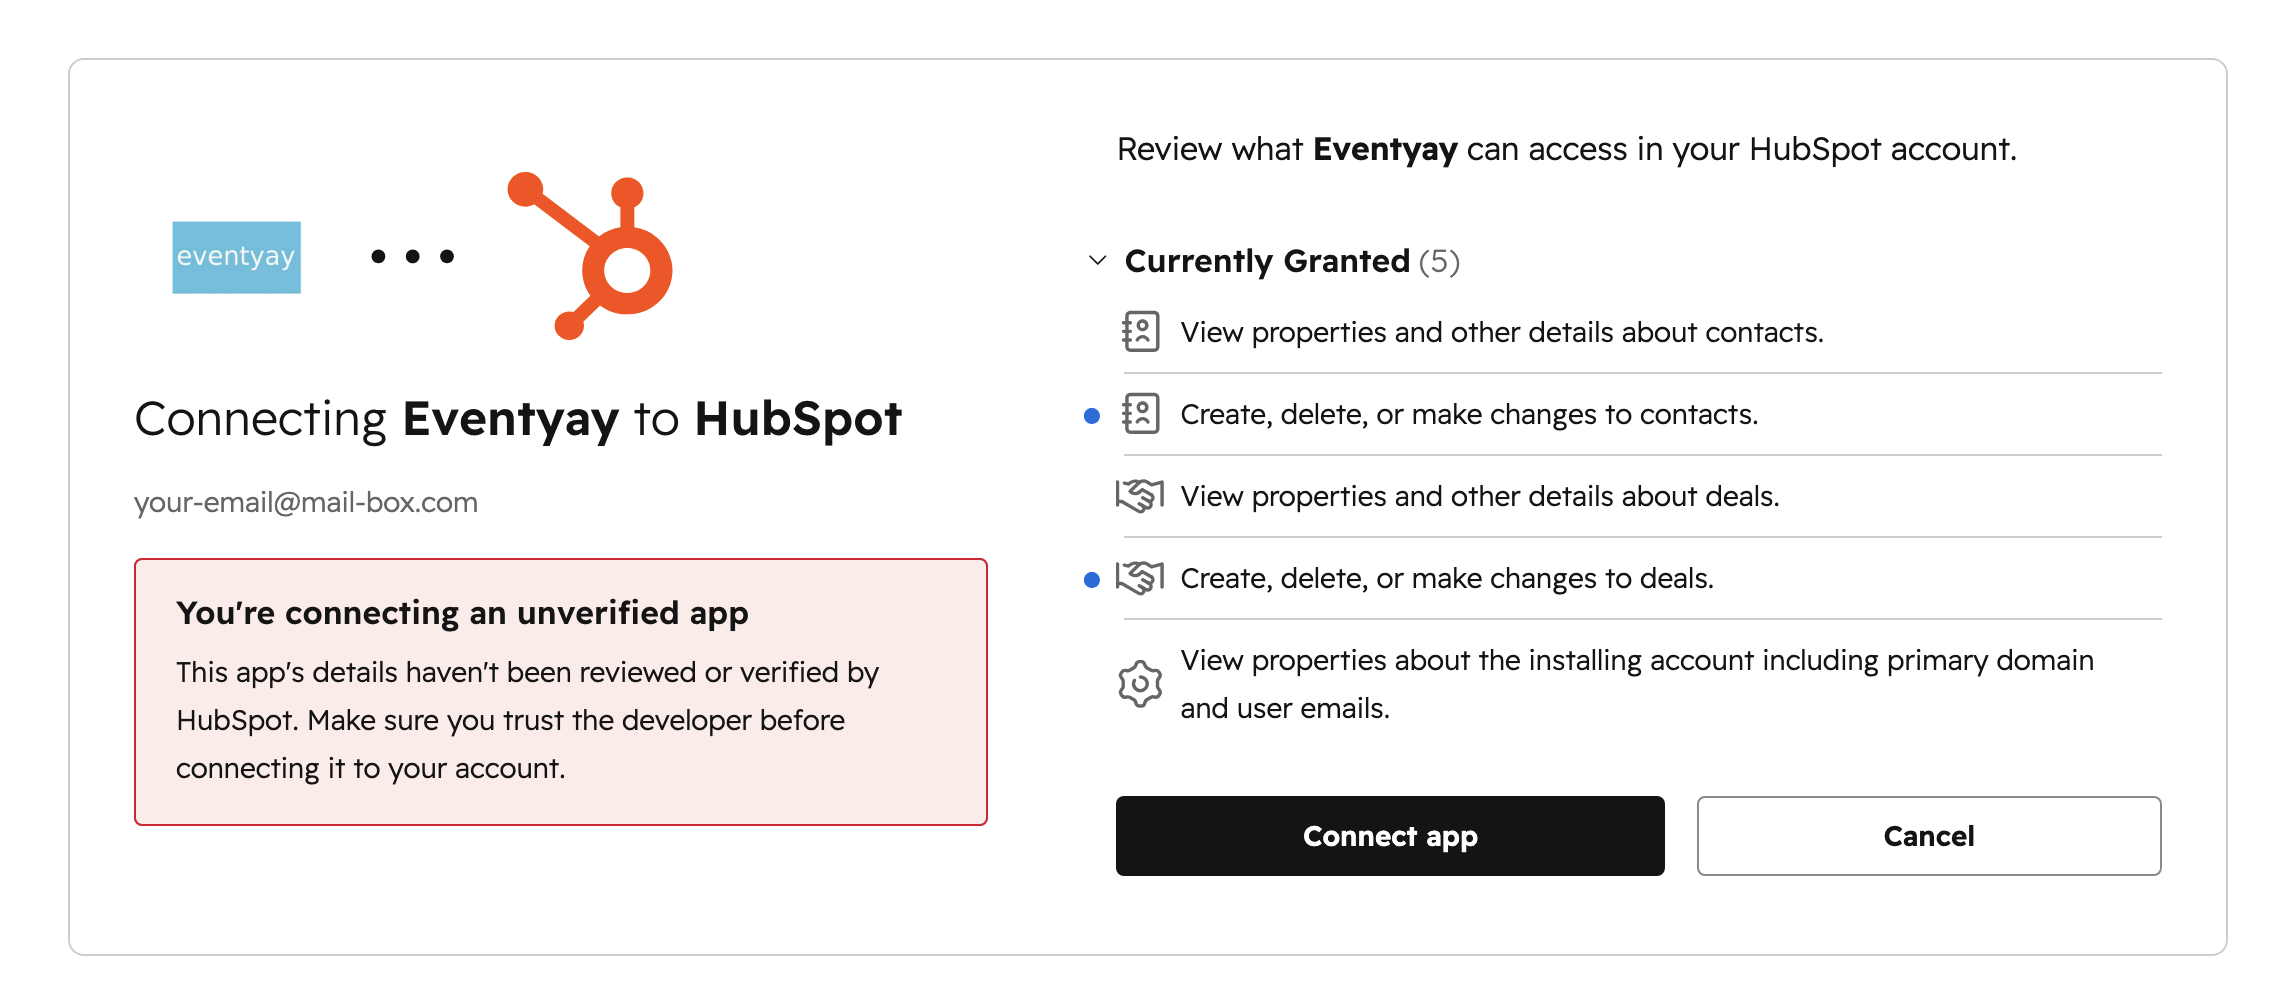
Step 4: If the app is not yet verified by HubSpot, you will see a risk confirmation dialog. Type I accept the risk and click Connect to proceed.
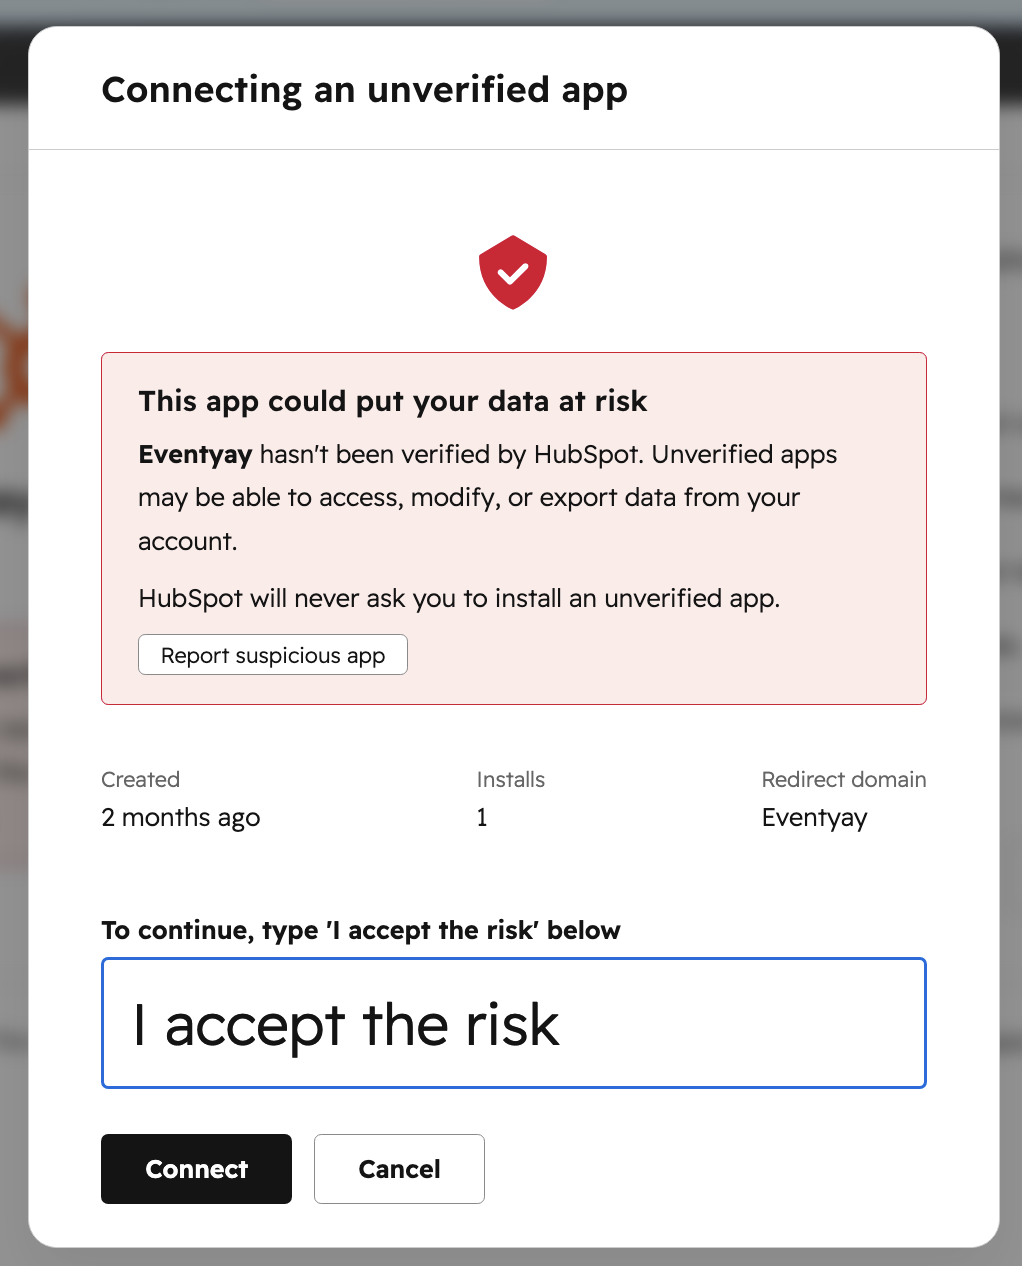
After authorization, you are redirected back to Eventyay and the connection status updates to show the connected portal.
Security Notes for Operators
OAuth Scopes: Eventyay requests permissions to create, update, and delete Contacts and Deals in HubSpot.
Data Storage: OAuth tokens are stored by Eventyay and are encrypted at rest using the application’s secret key.
Data Transfer: Enabling synchronization means attendee and order data will be sent to HubSpot under the granted scopes.
Revocation: Clicking Disconnect inside Eventyay will immediately revoke and clear the connection tokens.
Event HubSpot settings
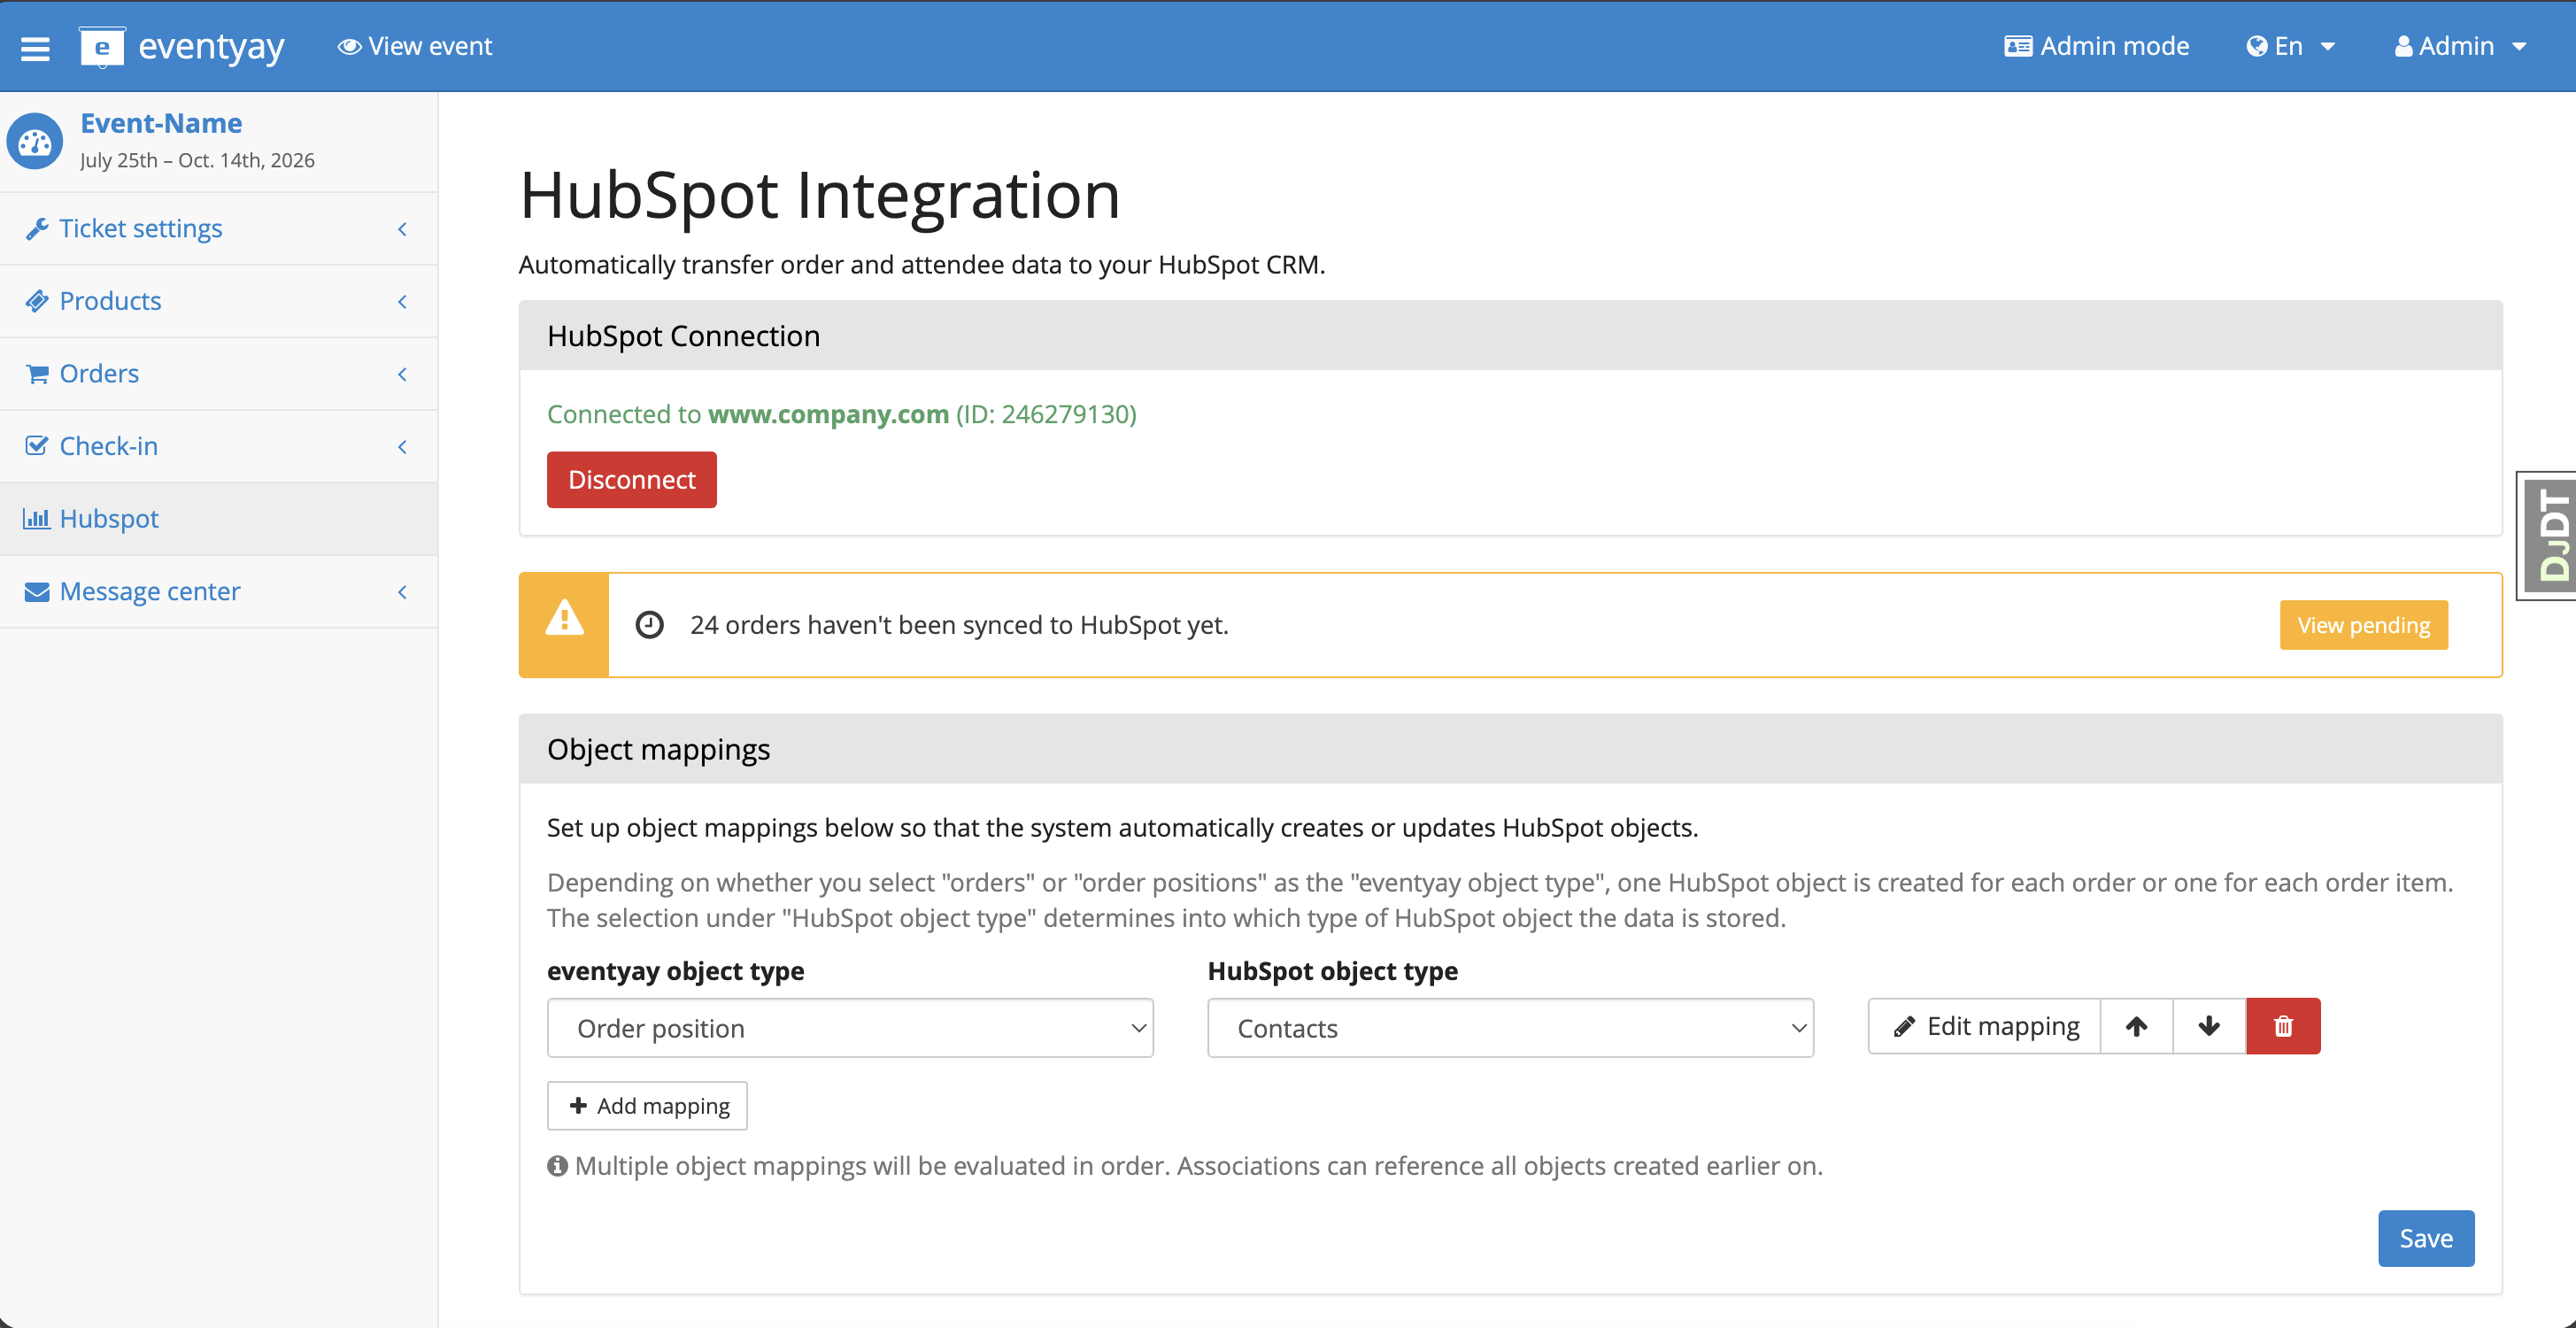
After connecting, the event-level HubSpot page is divided into several sections: the connection panel, object mappings, sync mapping settings, and recent activity.
HubSpot Connection
At the top you can see the connected HubSpot portal (domain and ID) and a red Disconnect button. If there are unsynced orders, a yellow warning banner appears (e.g. “24 orders haven’t been synced to HubSpot yet”) with a View pending link to the Sync Problems page.
Object mappings
Object mappings define what type of Eventyay data maps to what type of HubSpot object:
Eventyay object type – Either
Order(one HubSpot object per order) orOrder position(one HubSpot object per attendee/ticket within an order).HubSpot object type – Either
ContactsorDeals.
For example, mapping Order position to Contacts means that each attendee in an order creates or updates a Contact in HubSpot.
You can:
Click + Add mapping to create additional mappings (e.g. also map Orders to Deals).
Use the arrow buttons to reorder mappings. Multiple object mappings are evaluated in order, and associations can reference objects created by earlier mappings.
Click Edit mapping to configure the field-level mapping for that object type.
Click the red trash icon to delete a mapping.
Click Save to persist changes.
Sync Mapping
Below the object mappings, the Sync Mapping section controls how synchronization runs.
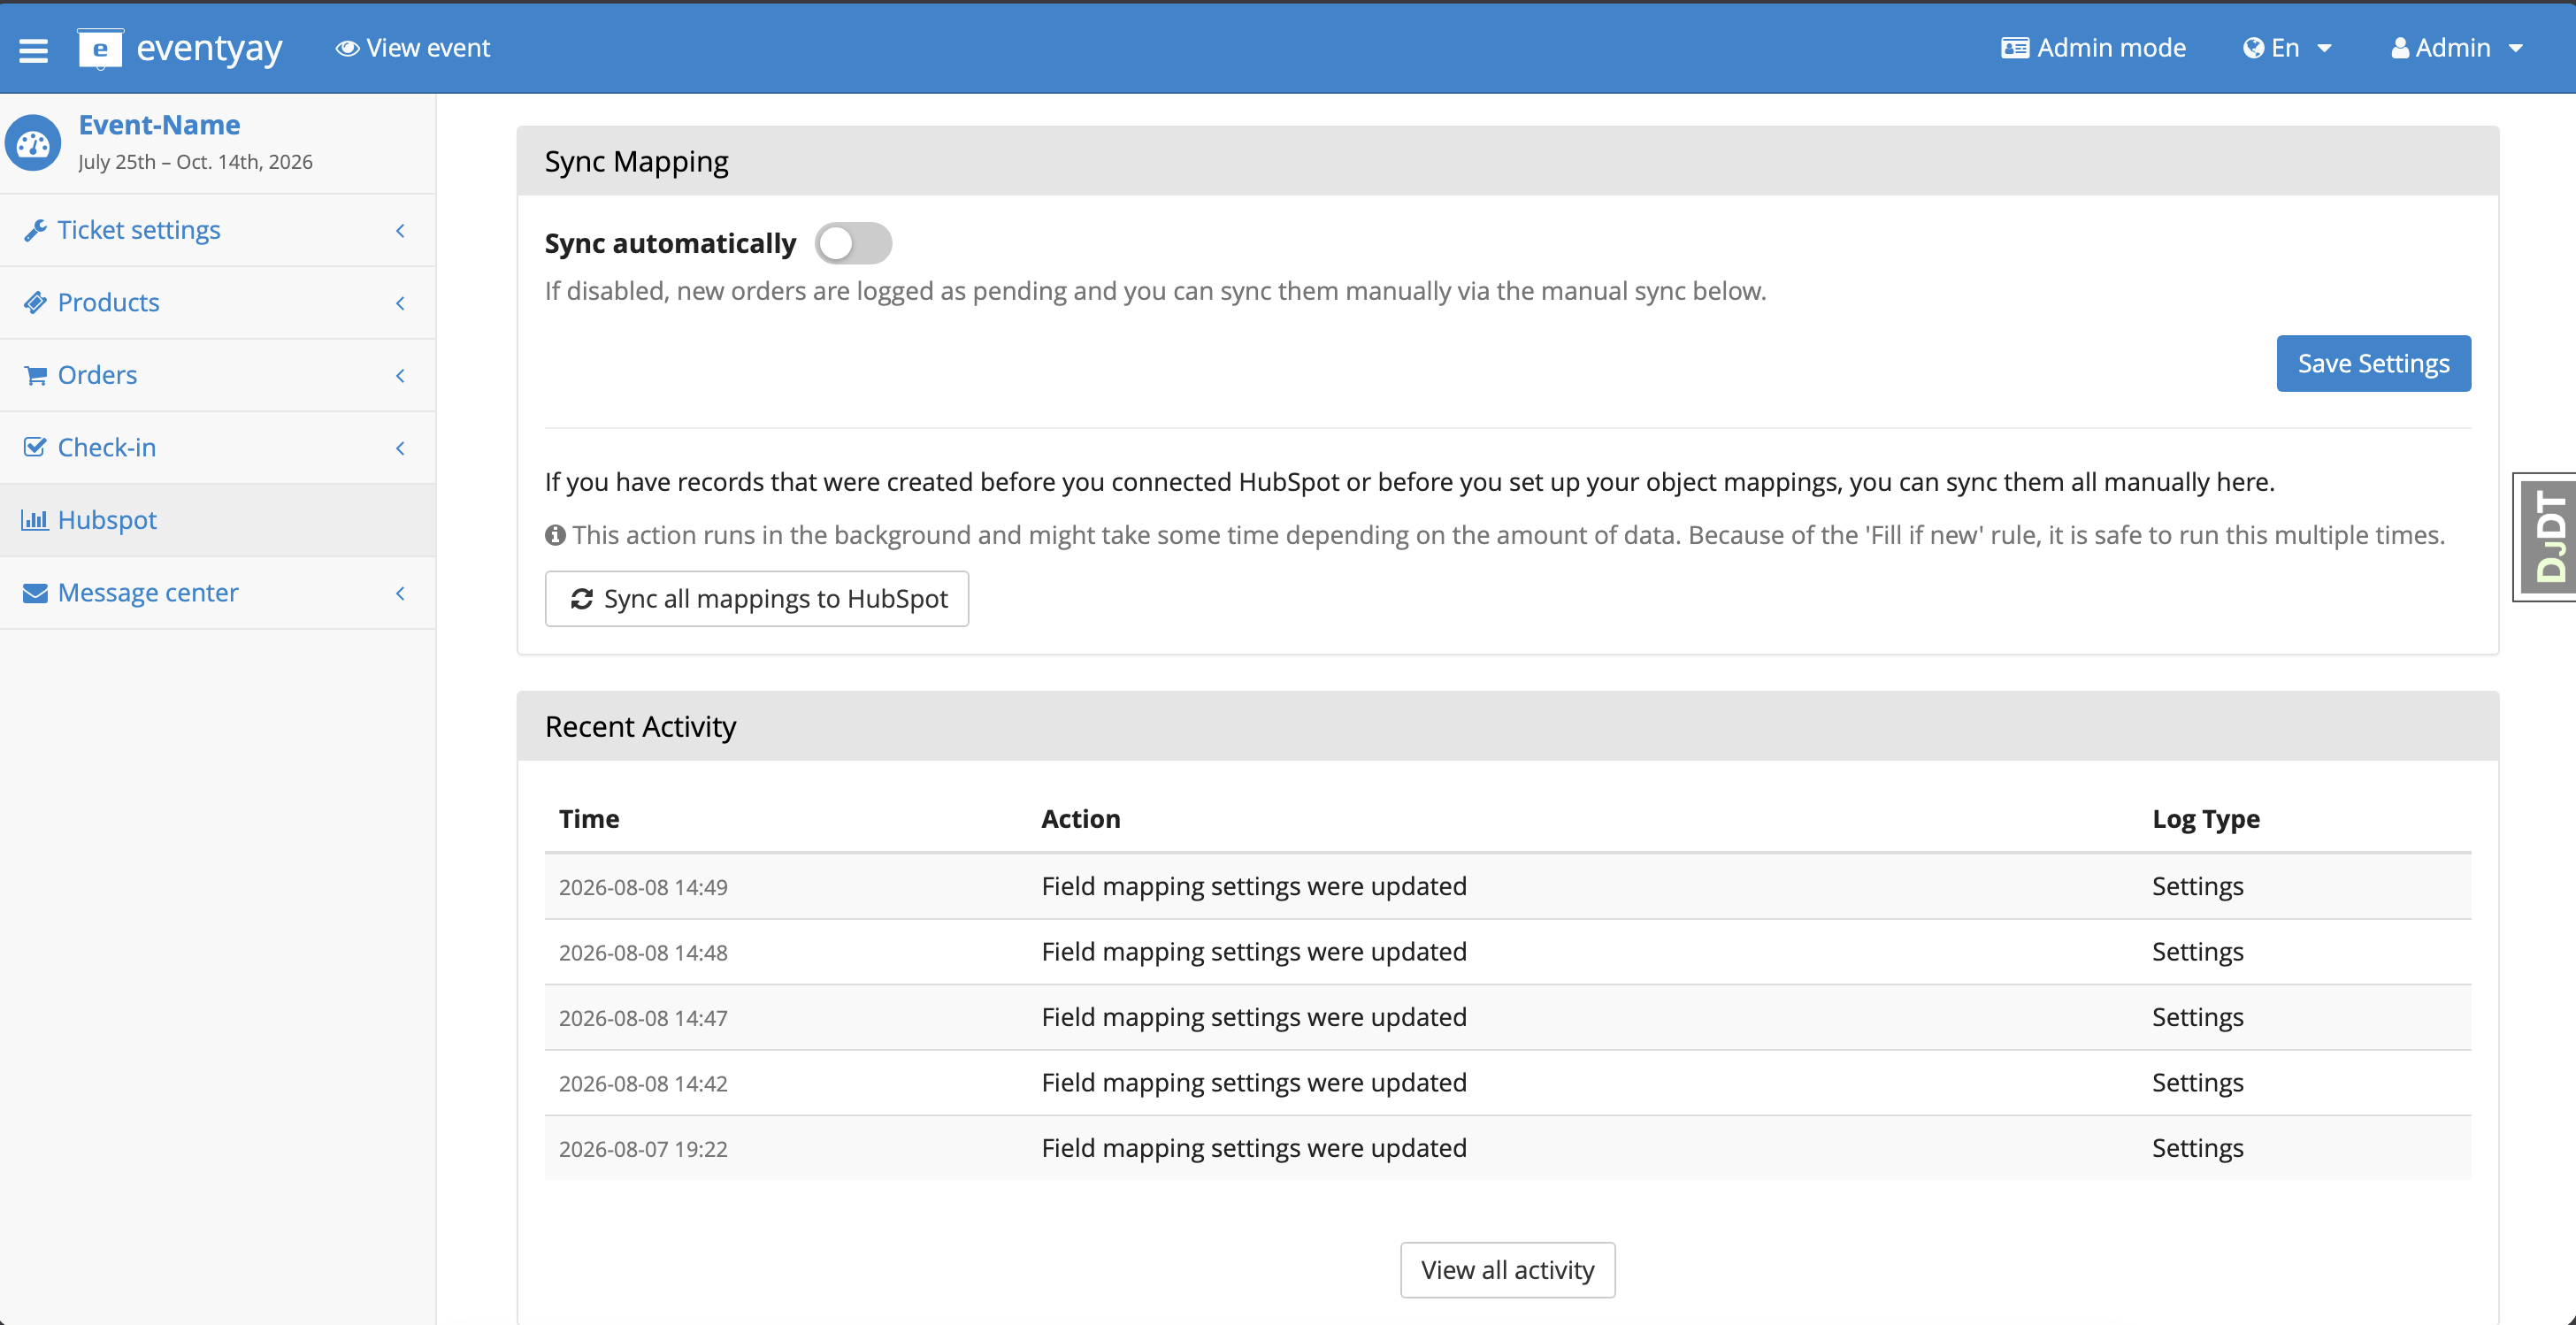
Sync automatically – When enabled, new paid orders are automatically synced to HubSpot in the background. When disabled, orders are logged as pending and can be synced manually.
Save Settings – Persists the auto-sync toggle.
Sync all mappings to HubSpot – A manual action that syncs all existing records. Use this to backfill records that were created before the plugin was connected or before object mappings were configured. This runs in the background and is safe to execute multiple times thanks to the Fill if new sync mode.
Recent Activity
A table showing the most recent audit log entries (e.g. “Field mapping settings were updated”) with timestamps and log type. Click View all activity to open the full Activity Log page.
Field mapping
After creating an object mapping, click Edit mapping to configure how individual fields map between Eventyay and HubSpot.
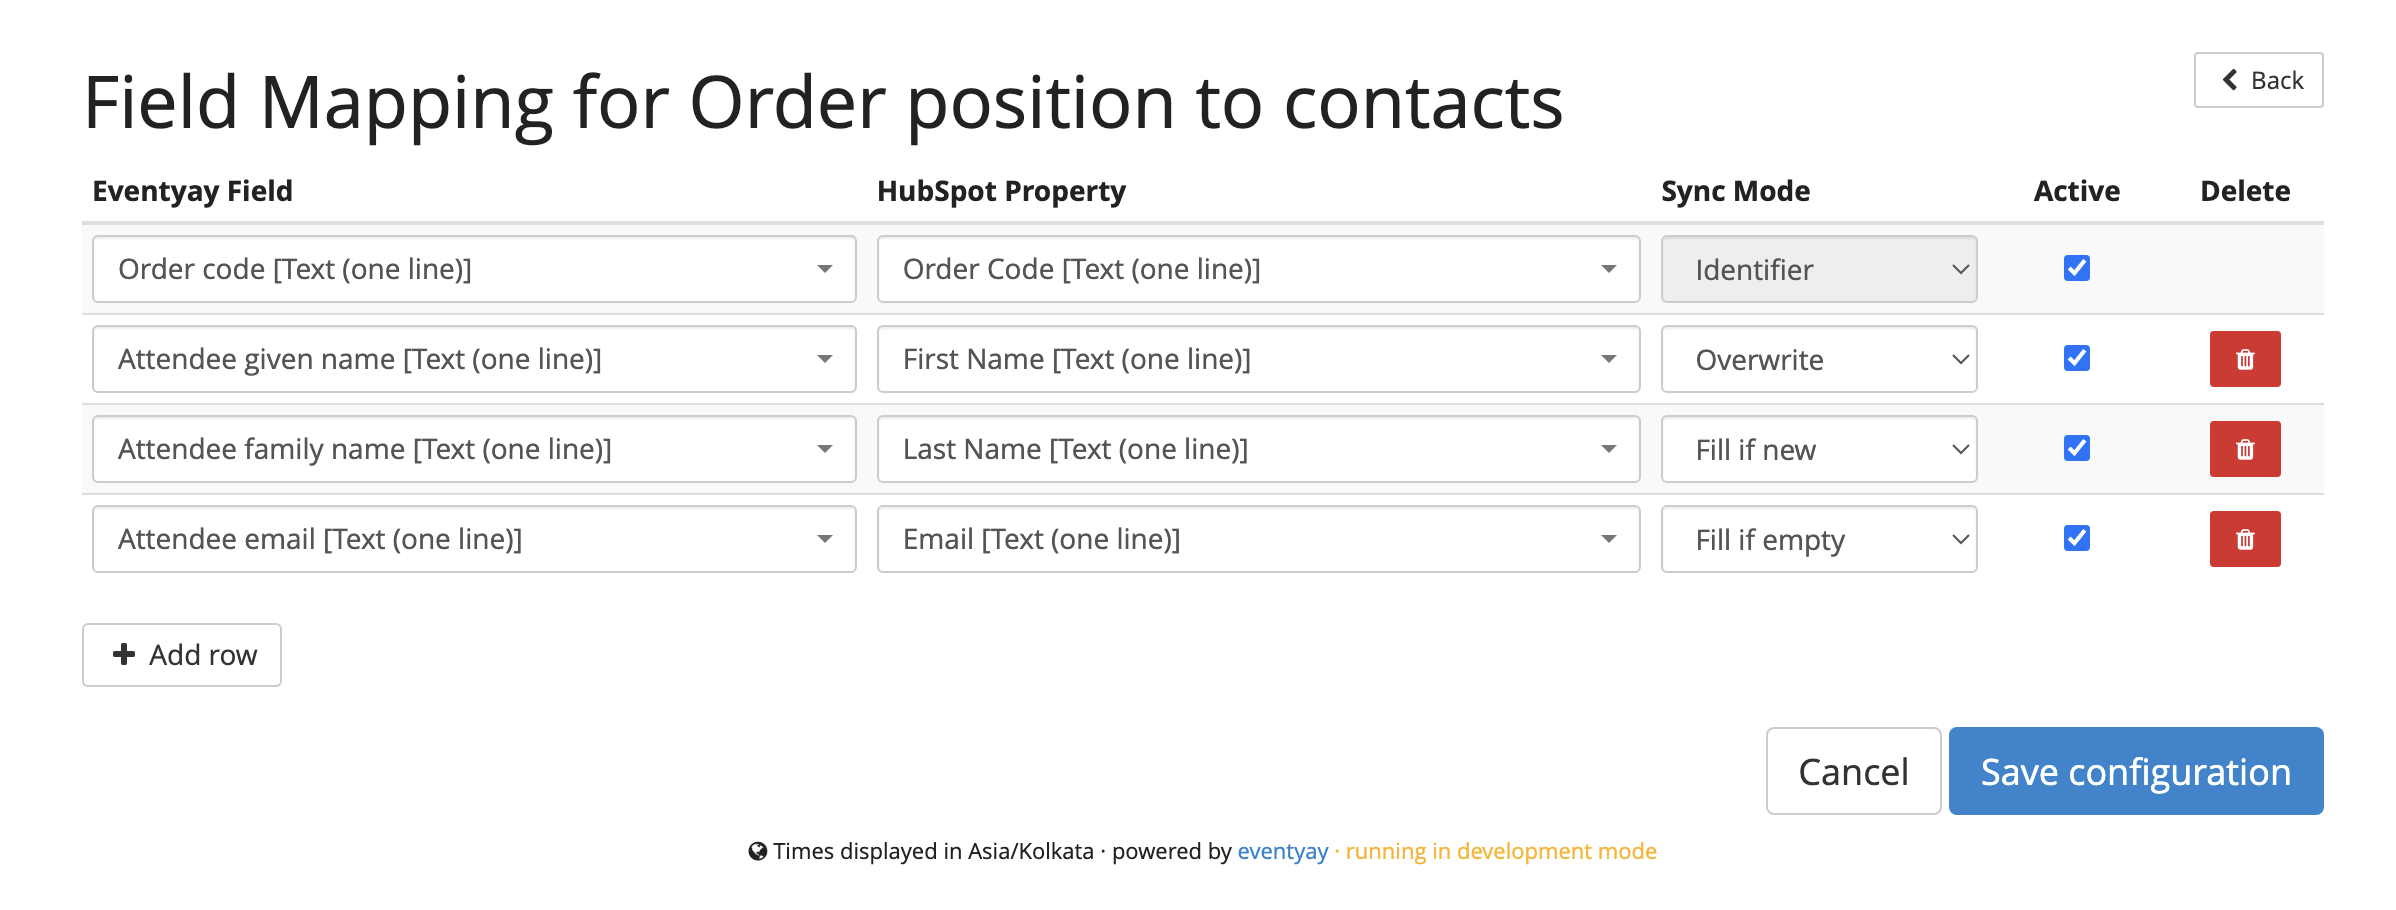
Each row has four columns:
- Eventyay Field
The source data from Eventyay. This dropdown lists all available fields for the selected object type, including built-in fields (Order code, Attendee given name, Attendee email, etc.) and any custom questions you have configured on your event.
- HubSpot Property
The target property in HubSpot. This dropdown is populated from your HubSpot account’s actual properties, so you can also map to any custom properties you have created in HubSpot.
- Sync Mode
Controls how the plugin handles the data during synchronization:
Identifier – This field uniquely identifies the record in HubSpot. Used to find existing records and prevent duplicates. For Contacts, this is typically the email address. For Deals, the order code. You should always have exactly one Identifier row per mapping.
Overwrite – Always update the HubSpot property with the current Eventyay value, even if the property already has data.
Fill if new – Only write this value when creating a new record. If the record already exists in HubSpot, this field is not updated. Useful for preserving manual edits made in HubSpot.
Fill if empty – Only write this value if the HubSpot property is currently empty. If it already has a value, Eventyay leaves it untouched.
- Active
A checkbox to enable or disable the field mapping row without deleting it.
- Delete
Click the red trash icon to remove a field mapping row.
Click + Add row to add another field mapping. Click Save configuration when done.
Mapping Conflicts
If an event uses custom mappings and there are changes to the organizer default mappings, a conflict might arise (for example, if the default mapping requires a different unique identifier).
When a conflict occurs, the Your Events table on the Organizer HubSpot page will display a warning: Conflict with defaults.
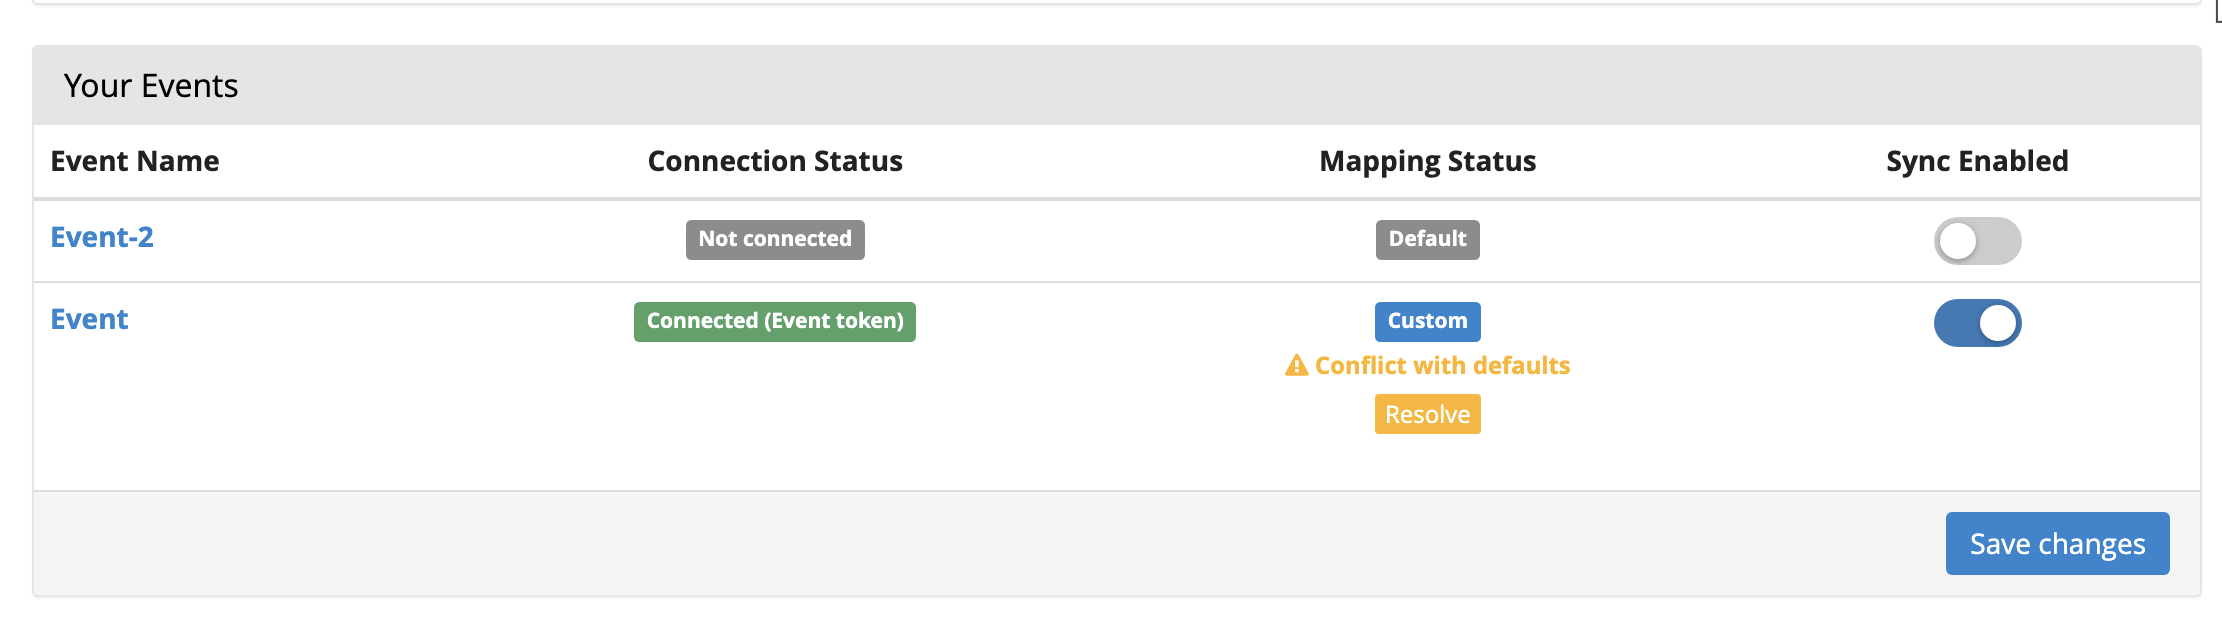
Clicking the Resolve button takes you to the event’s Field Mapping page, where an Identifier Conflict Detected banner appears.
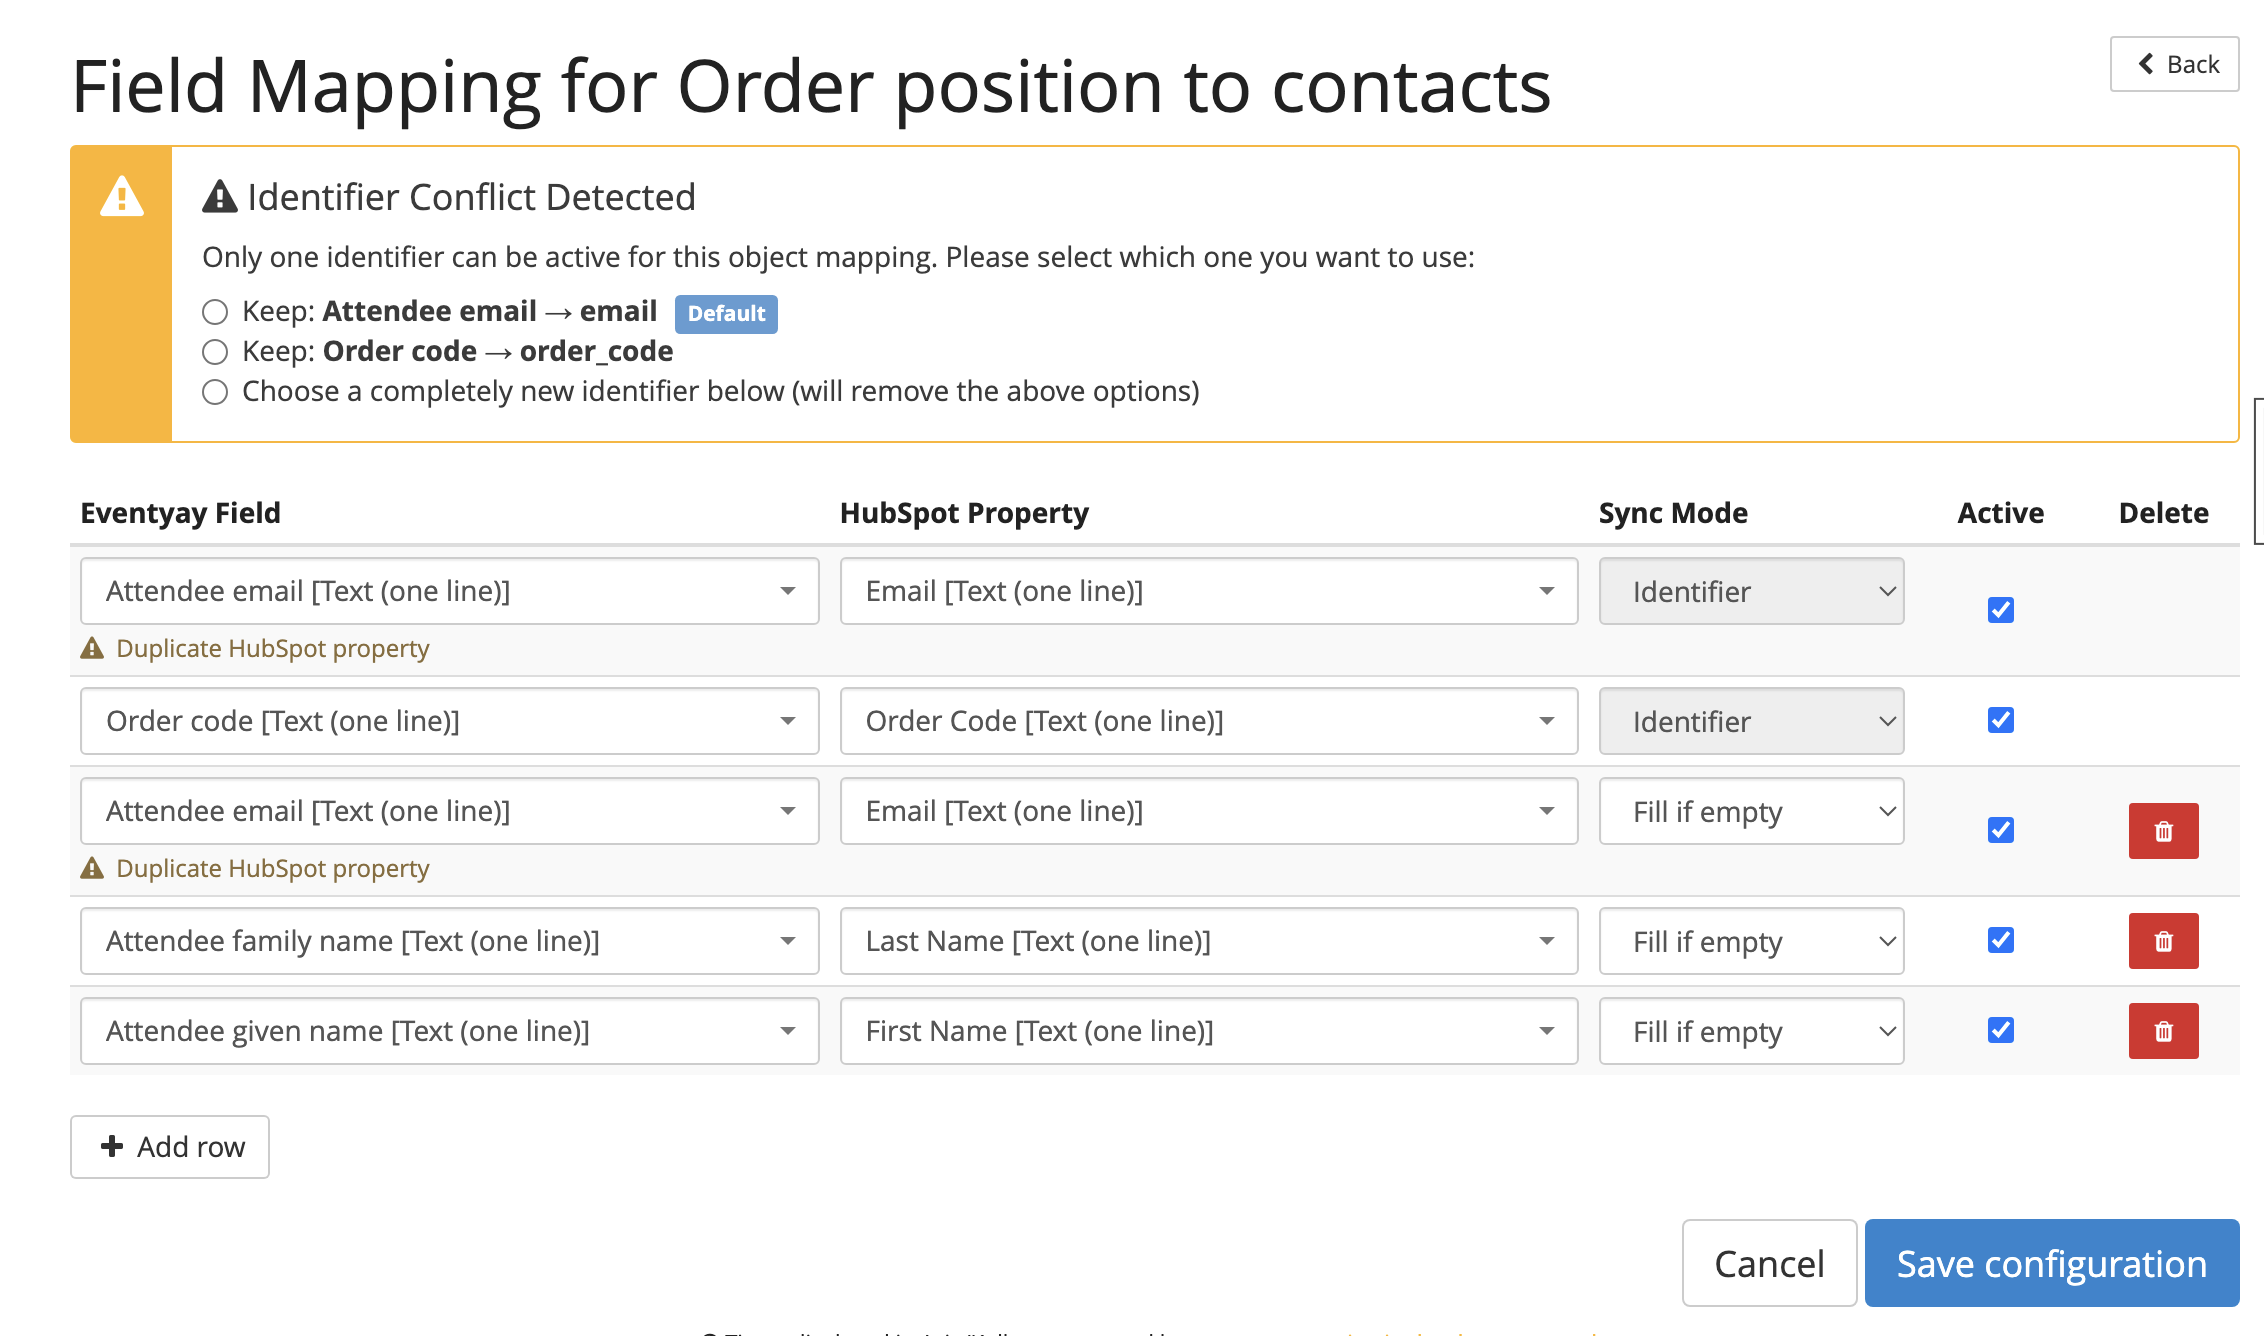
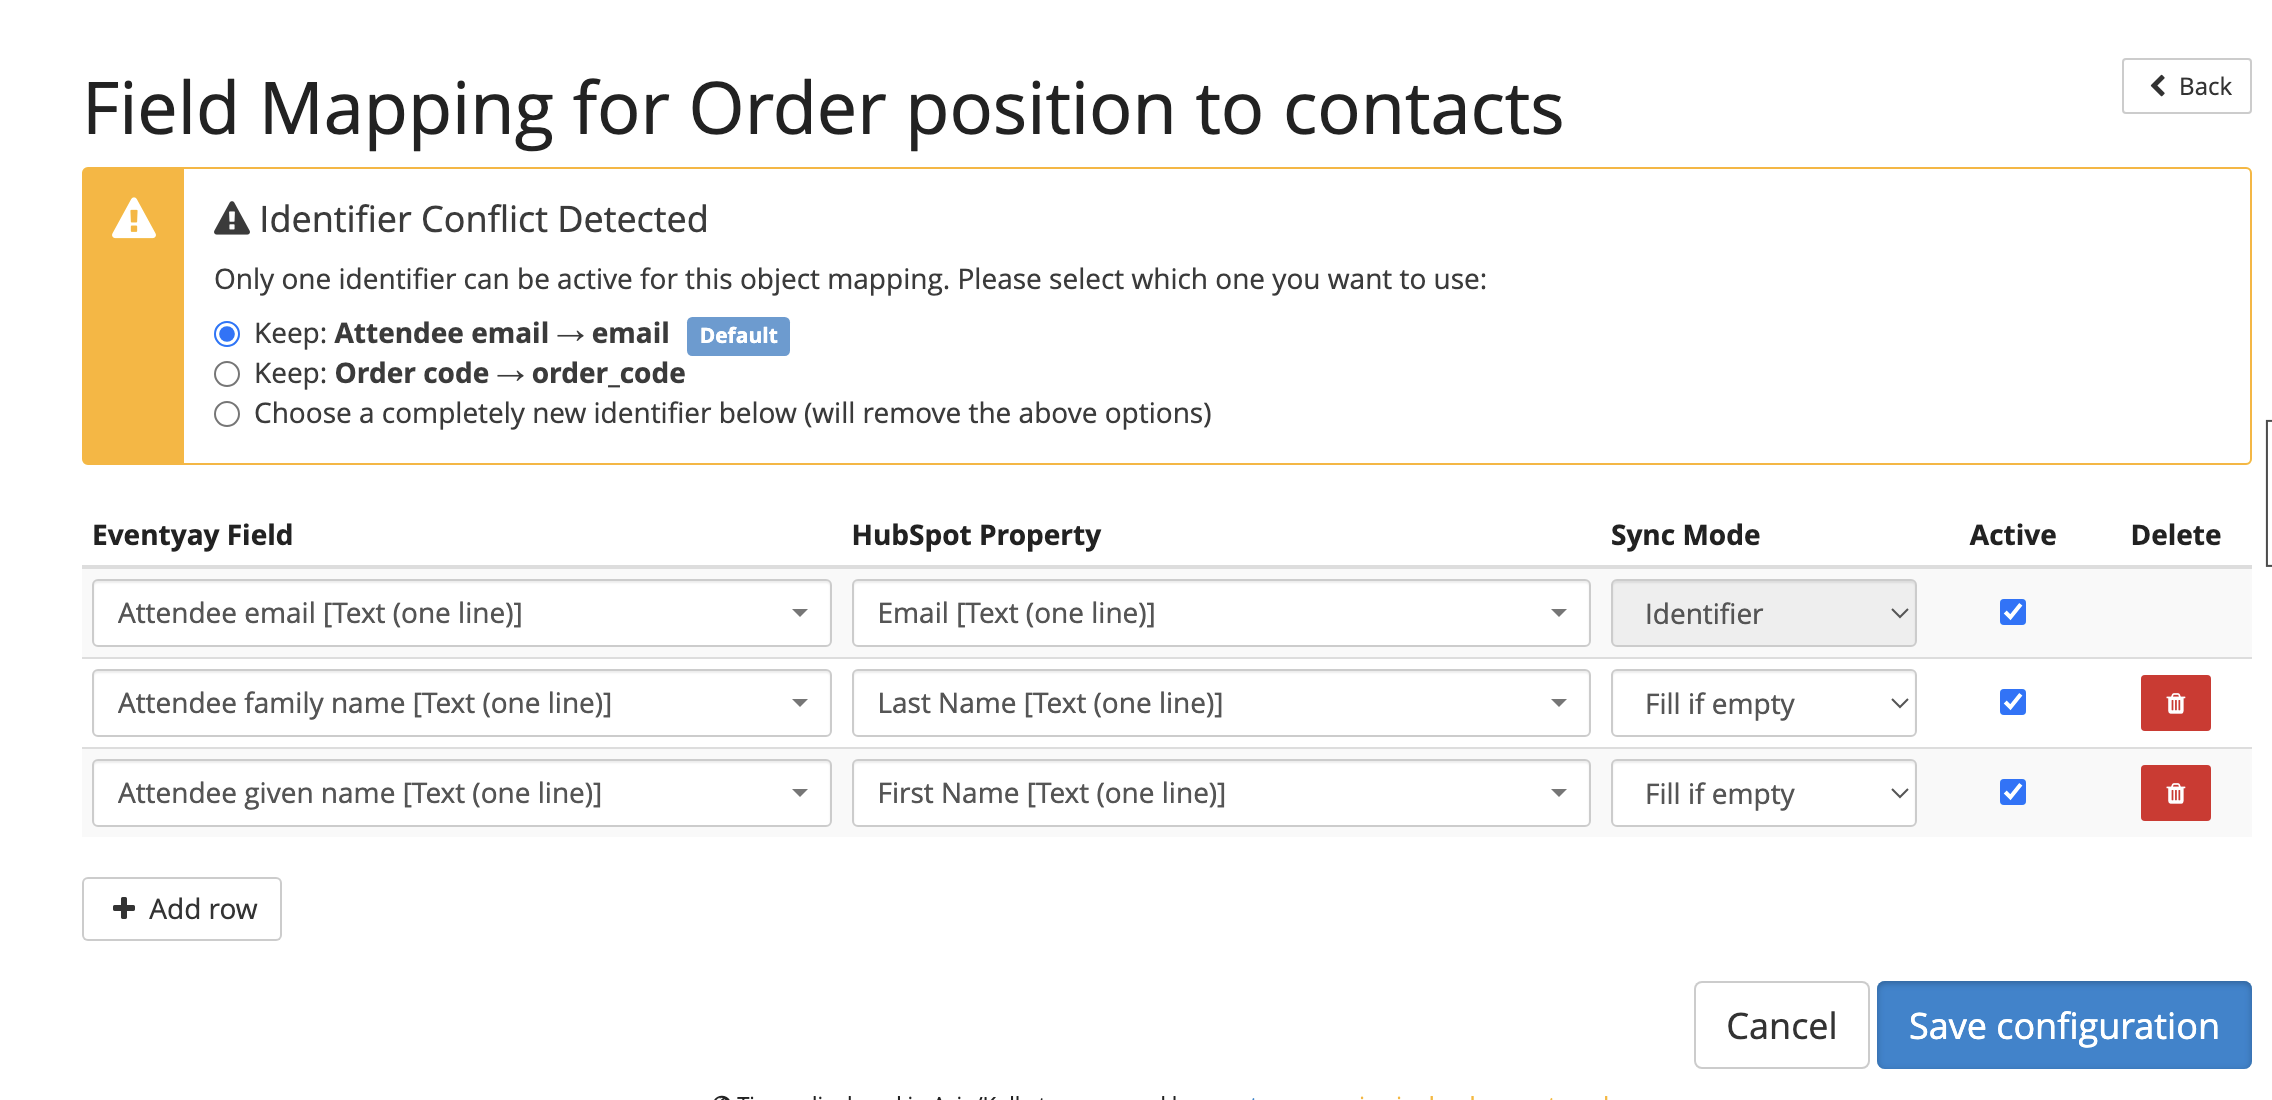
Since an object mapping can only have one active identifier, you must choose how to resolve the conflict:
Keep the default identifier: This uses the identifier from the organizer’s default settings.
Keep your custom identifier: This retains the identifier you previously configured for this event.
Choose a completely new identifier: This disables both current identifiers and lets you configure a new one manually.
Select your preferred option and click Save configuration. The conflict warning will be removed and your mappings will be updated.
Activity Log
The Activity Log provides a full history of all HubSpot-related actions for your event, combining both sync operations and settings changes into one view.
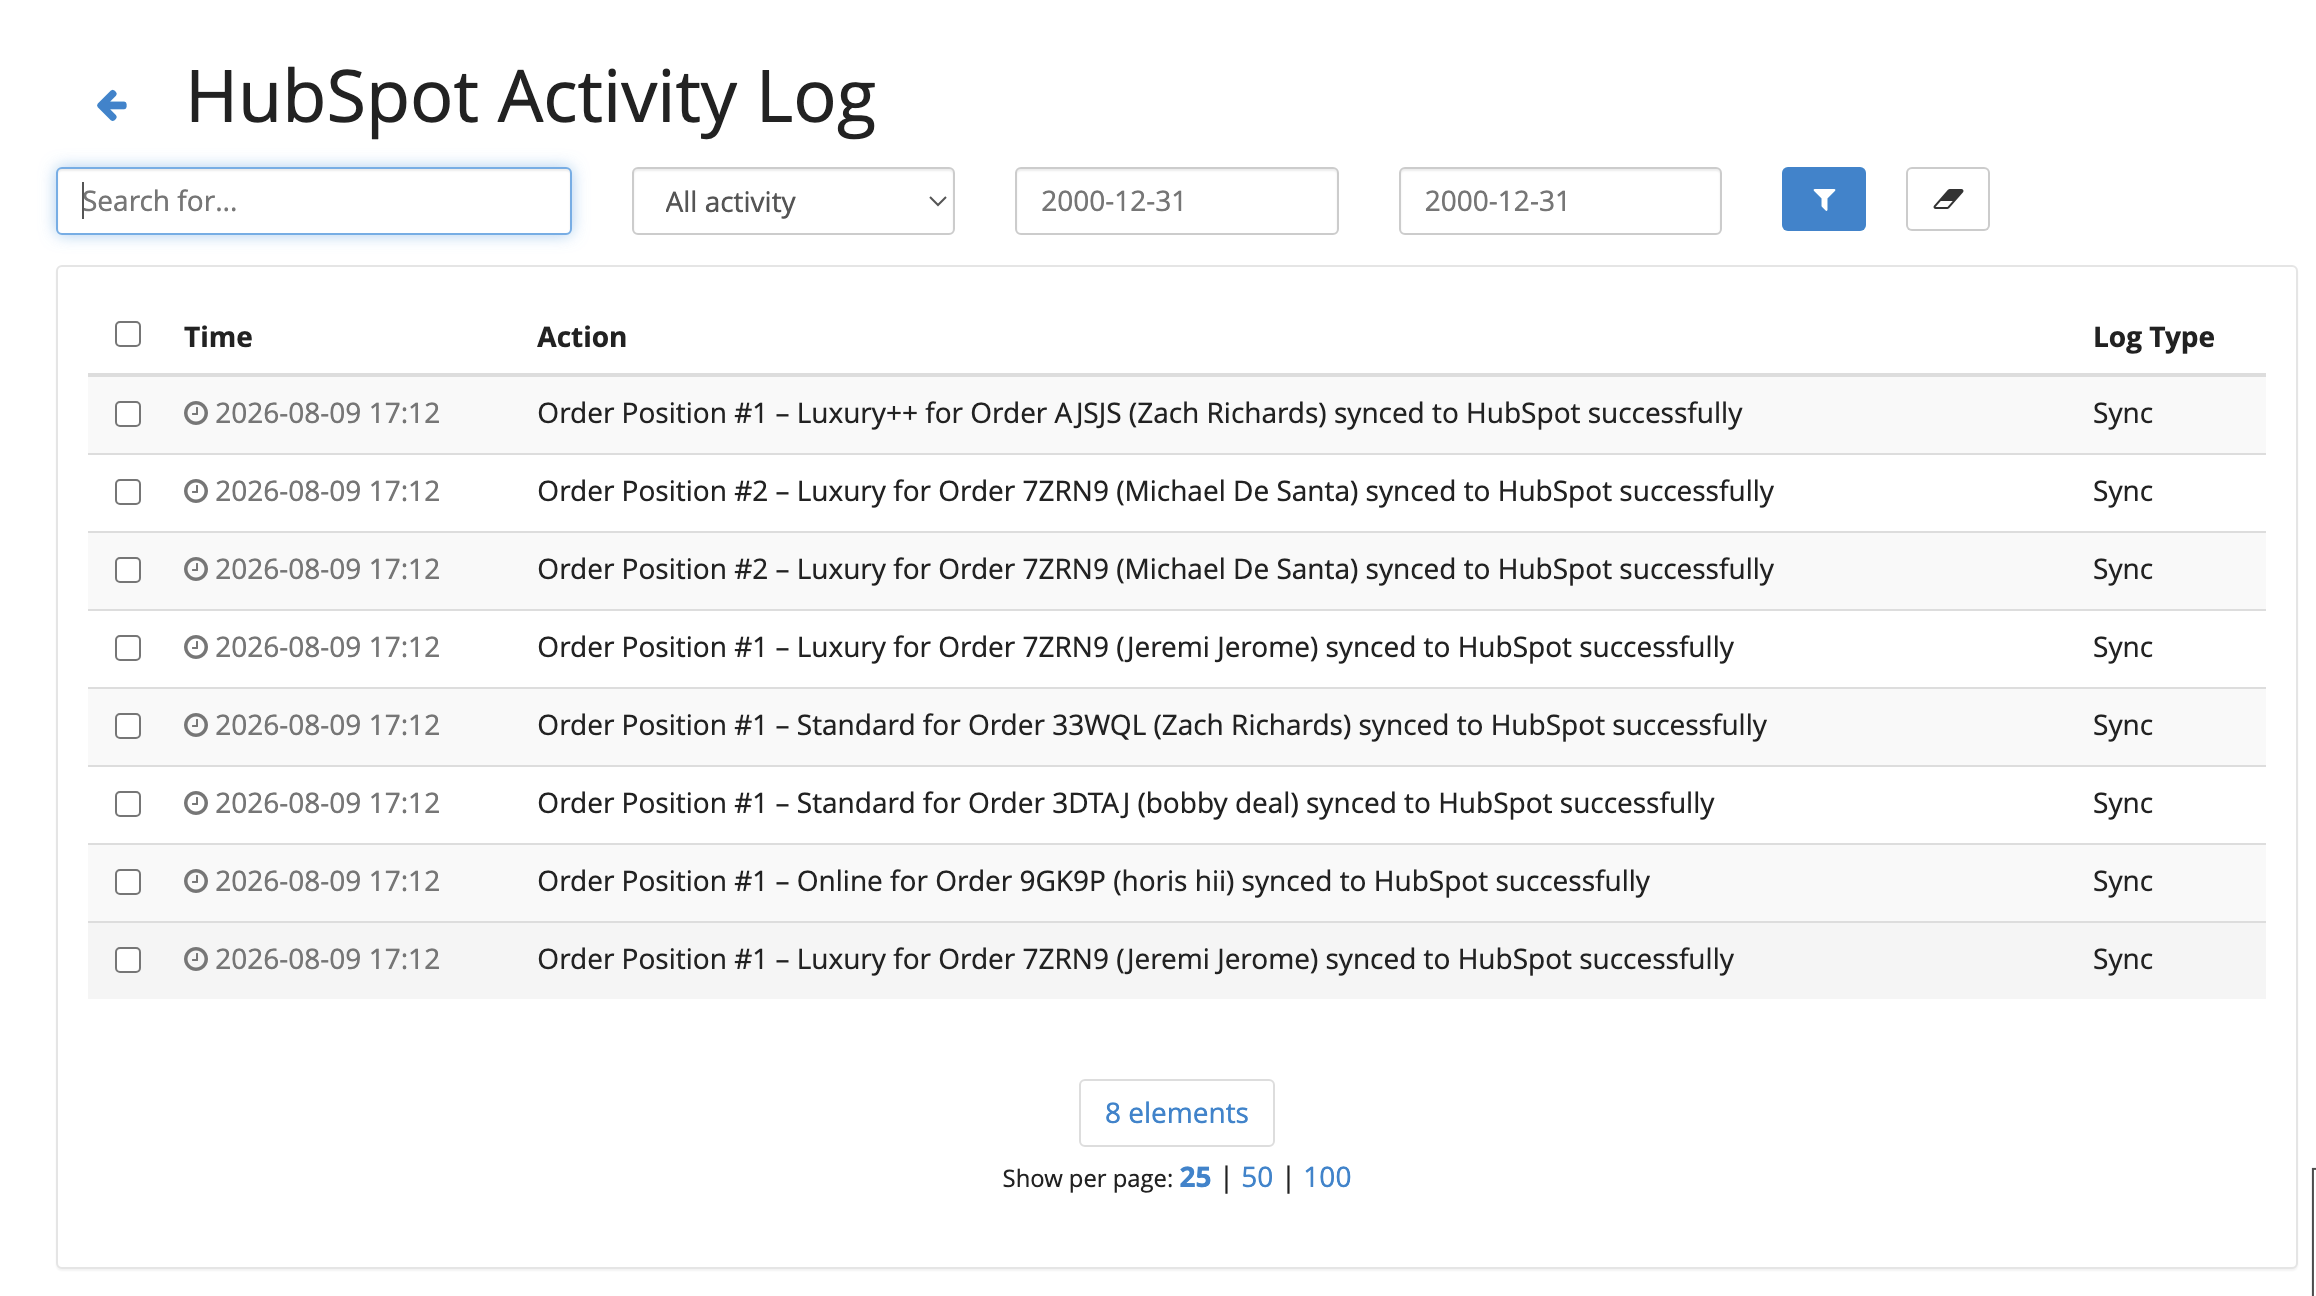
The log page provides:
Search – Free-text search across log entries.
Filter by type – Filter to show only sync activities, only settings changes, or all.
Date range – Filter by date range to narrow results.
Log Type column – Shows whether the entry is a
Syncevent (e.g. “Order Position #1 synced to HubSpot successfully”) or aSettingsevent (e.g. “Field mapping settings were updated”).Pagination – Results are paginated with configurable page sizes (25, 50, 100).
Bulk delete – Select individual log entries (or all) and delete them.
Sync Problems
If synchronization fails for any record, the Sync Problems page shows you exactly what went wrong and lets you take action.
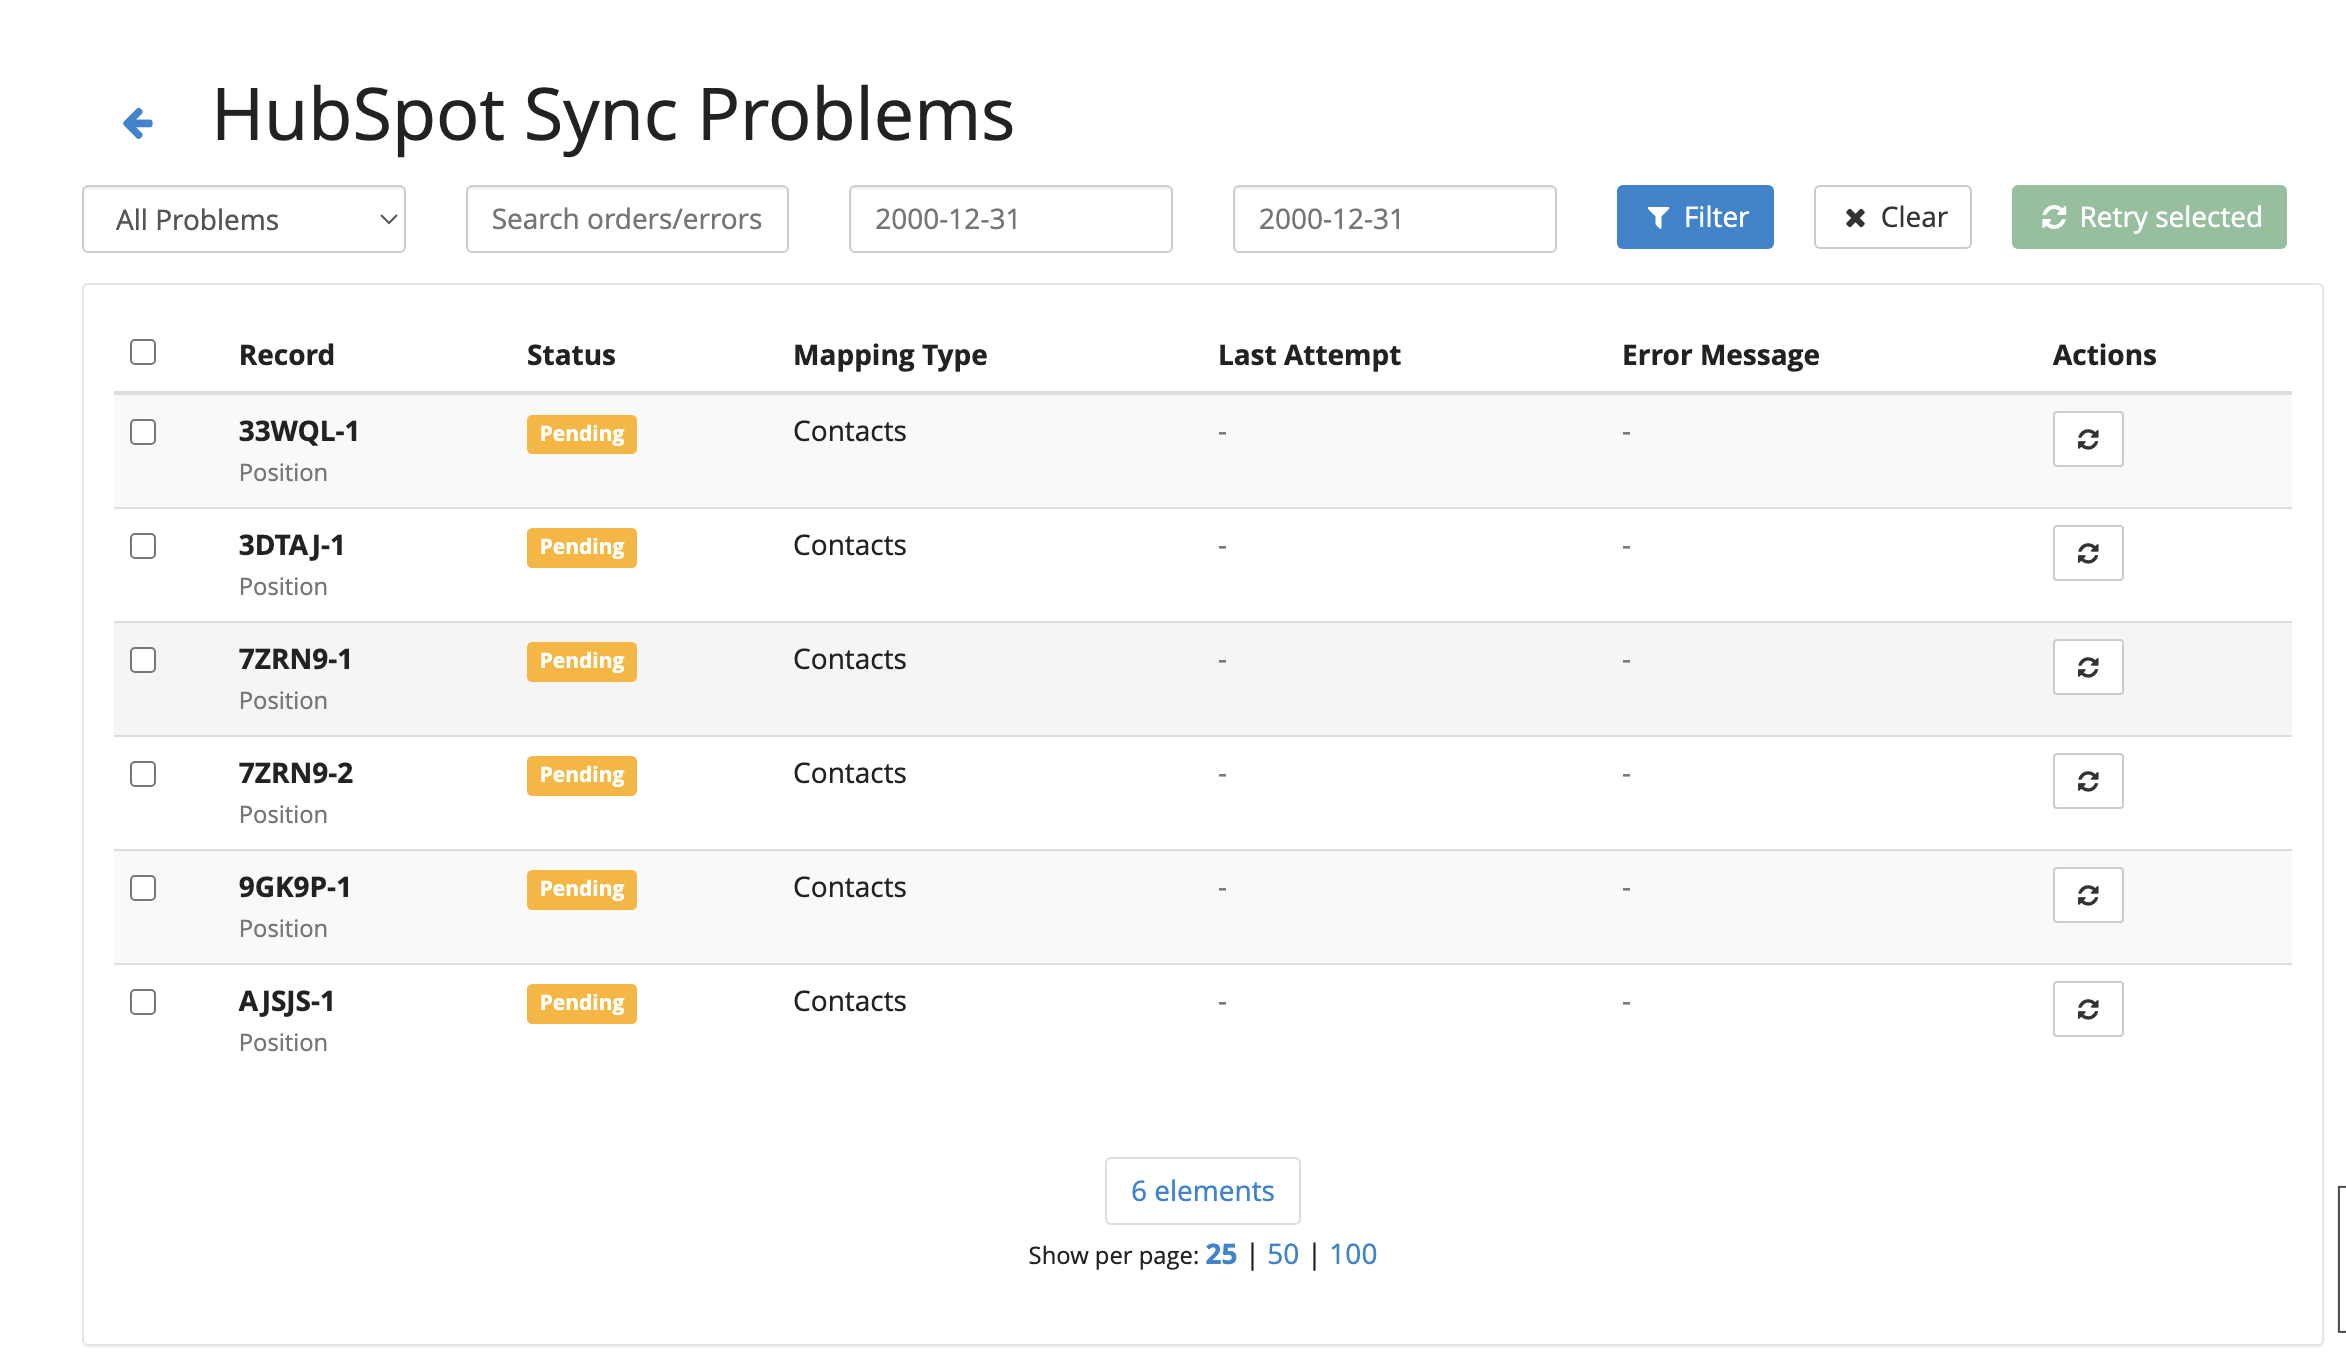
Each row shows:
Record – The order code and position number (e.g.
33WQL-1), with the record type (Position) below it.Status – Either
Pending(not yet attempted) orFailed(sync was attempted and returned an error).Mapping Type – Which HubSpot object this record maps to (e.g.
Contacts).Last Attempt – When the last sync was tried.
Error Message – A description of what went wrong (e.g. authentication failure, invalid field data, duplicate record).
Actions – A retry button to re-queue the individual record for sync, and a dismiss button to ignore the error.
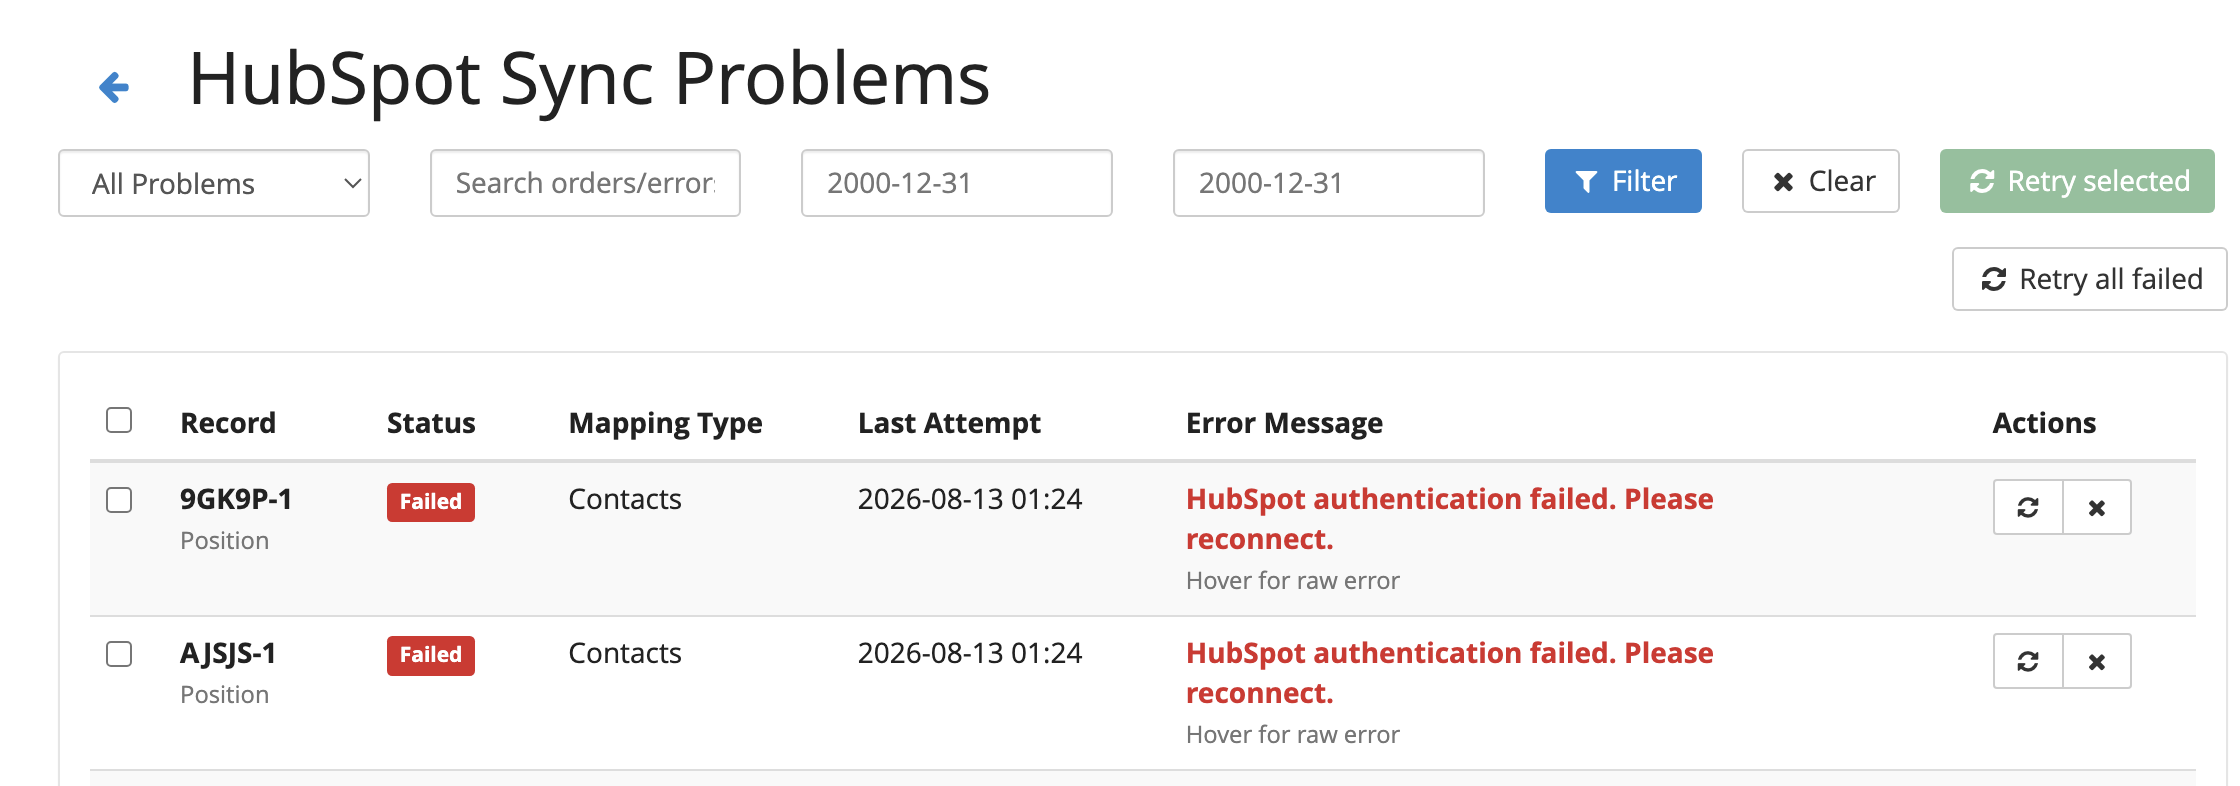
The page also provides bulk actions:
Filter toolbar – Filter by status (All Problems, Pending, Failed), search by order code or error text, and filter by date range.
Retry selected – Select multiple records using the checkboxes and click the green Retry selected button to bulk-retry them.
Retry all failed – Click this button to quickly re-queue all records that are currently in a failed state.
Order Details HubSpot Sync
You can also view the HubSpot sync status for an individual order directly from its order details page in the Eventyay backend.
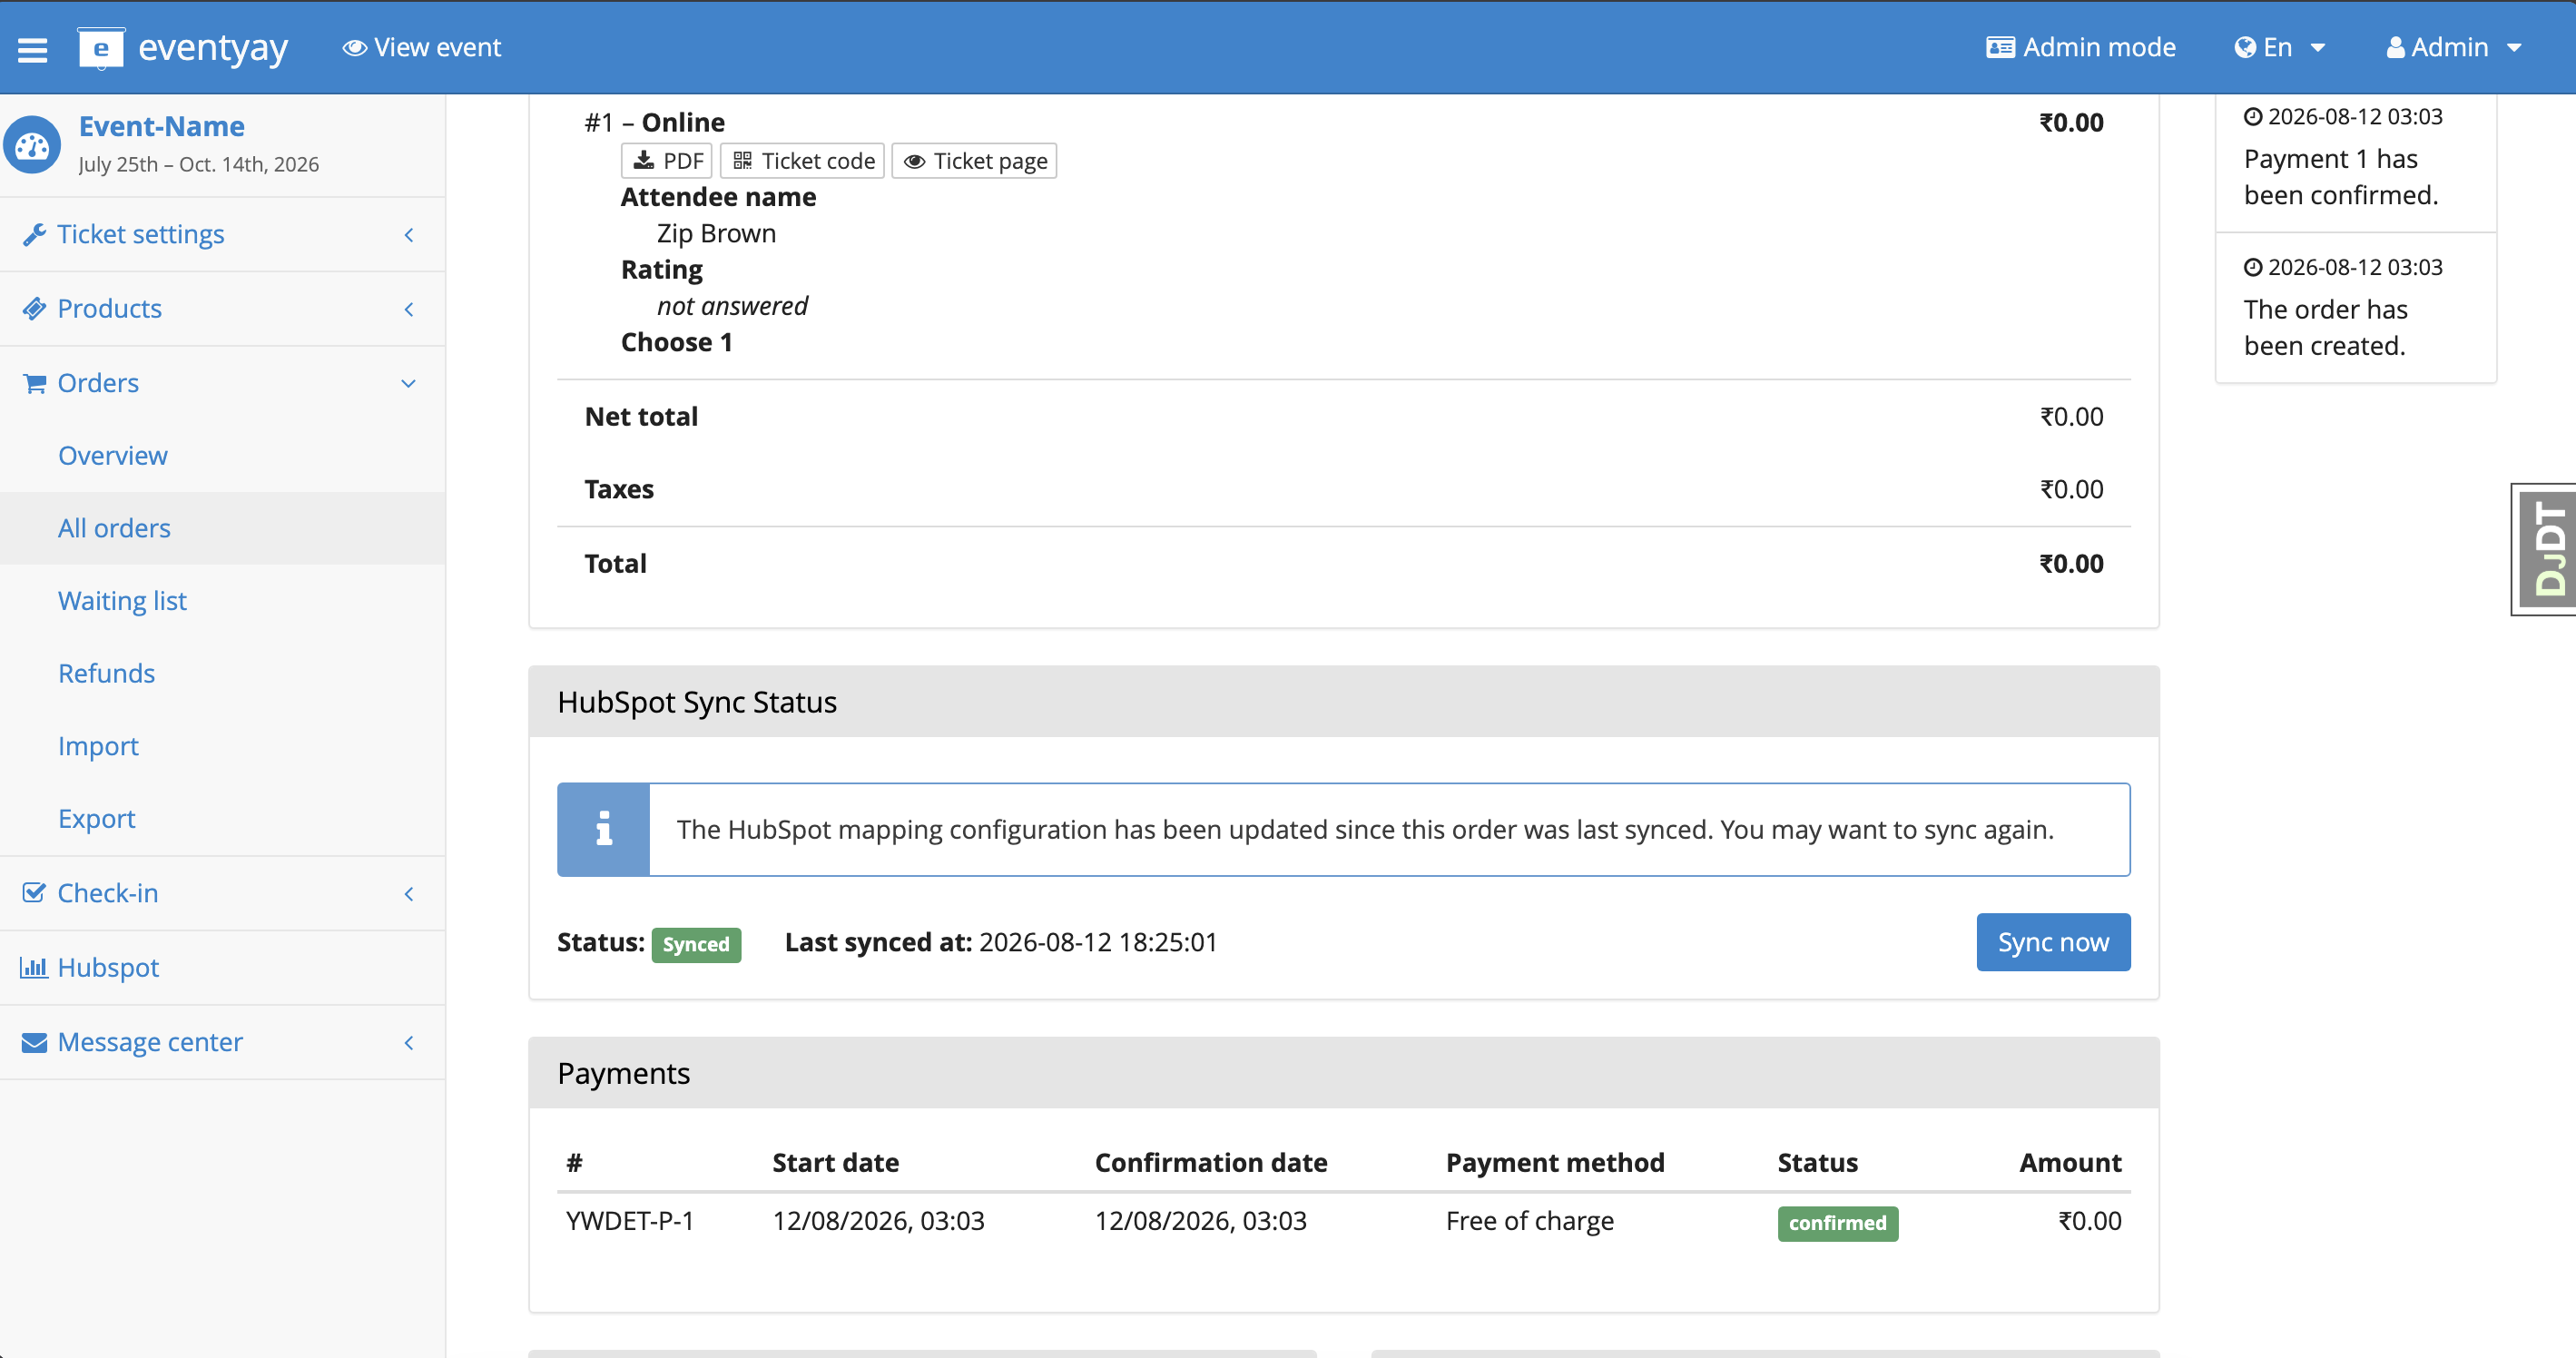
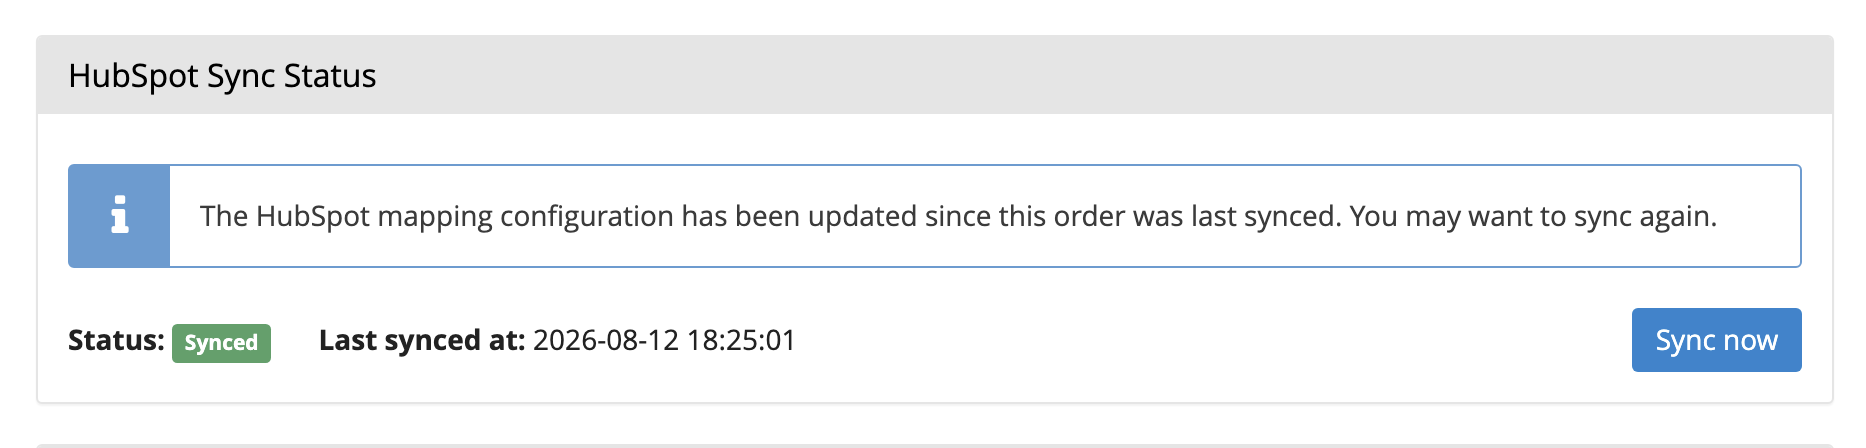
In the HubSpot Sync Status panel, you can see the current sync state (e.g., Waiting to sync or Synced). If an order hasn’t been synced yet, or if you want to push an update manually, you can click the Sync now button.

If your HubSpot mapping configuration has been updated since the order was last synced, an info banner will notify you. This helps you identify orders that might need to be re-synced to apply the new mappings.
Disconnecting
To disconnect HubSpot:
Event level: Click the red Disconnect button in the HubSpot Connection panel on the event page. This revokes the OAuth token at HubSpot and disables sync for that event.
Organizer level: Click Disconnect on the organizer HubSpot page. This revokes the organizer token and disables sync for all events that were using the organizer-level connection (events with their own event-level tokens are unaffected).